
Move your site from Squarespace to WordPress
If you are looking for a Squarespace alternative or planning to move from Squarespace to WordPress, you do not have to start over from a blank page. Squarespace includes an export option, but its standard .xml file leaves out your design and store pages, and Squarespace itself warns that images may not come over. With ShipPress for Mac, Windows & Linux, you can copy the live pages you pick and the pictures it finds into WordPress before you cancel Squarespace.
-
Why Squarespace's export alone isn't enough
Squarespace provides a built-in feature to export site content, but the resulting WordPress-format .xml file is limited. It includes layout pages, text blocks, image blocks, gallery pages, and only one blog page with its posts. It leaves out album, cover, index, info, calendar, portfolio, and store pages. Content in page-specific headers, footers, or sidebars is omitted, as are audio blocks, video blocks, product blocks, style settings, and custom CSS.
Crucially, Squarespace warns that images might not migrate when importing the .xml file into WordPress, leaving only links that stop working once your old site is cancelled. You can verify these details in Squarespace's official help article on exporting. Because of these limitations, you should migrate Squarespace to WordPress while your Squarespace site is still online and published, well before you cancel your subscription.
-
Download the .xml as a backup first
Before starting the transition, make a text backup of your blog using Squarespace's official export feature. In Squarespace, navigate to Import & export content, click Export, and choose the WordPress icon.
Your site must be published and set to Public, as exports cannot be run on trial sites. The export process takes a few minutes. Once finished, click Download and keep the .xml file safe on your computer. Keep in mind that only one blog page is included, and if an expired site needs exporting later, you may have to reactivate your subscription, though older content might already be removed.
-
Import your live site from Squarespace to WordPress
Open ShipPress on your computer (Mac, Windows or Linux). On the Home screen, click the Import from a website tab. The panel displays the heading Import a website from its address and the question Which website do you want to copy?, noting that your original site is never modified and no credits are used.
Type or paste the public address of your Squarespace site (such as yourname.squarespace.com, or your own domain if the site uses one). The site must be online and public. Click Next, give your new site a name if you like, and click Scan pages. ShipPress respects robots.txt rules and scans the pages listed in your sitemap.xml. Unlike the standard export file, this method reads live pages and downloads the pictures, videos, and fonts it finds into your new WordPress site, without being confined to a single blog or layout page. For more details on this process, see our guide on importing a website from its address.
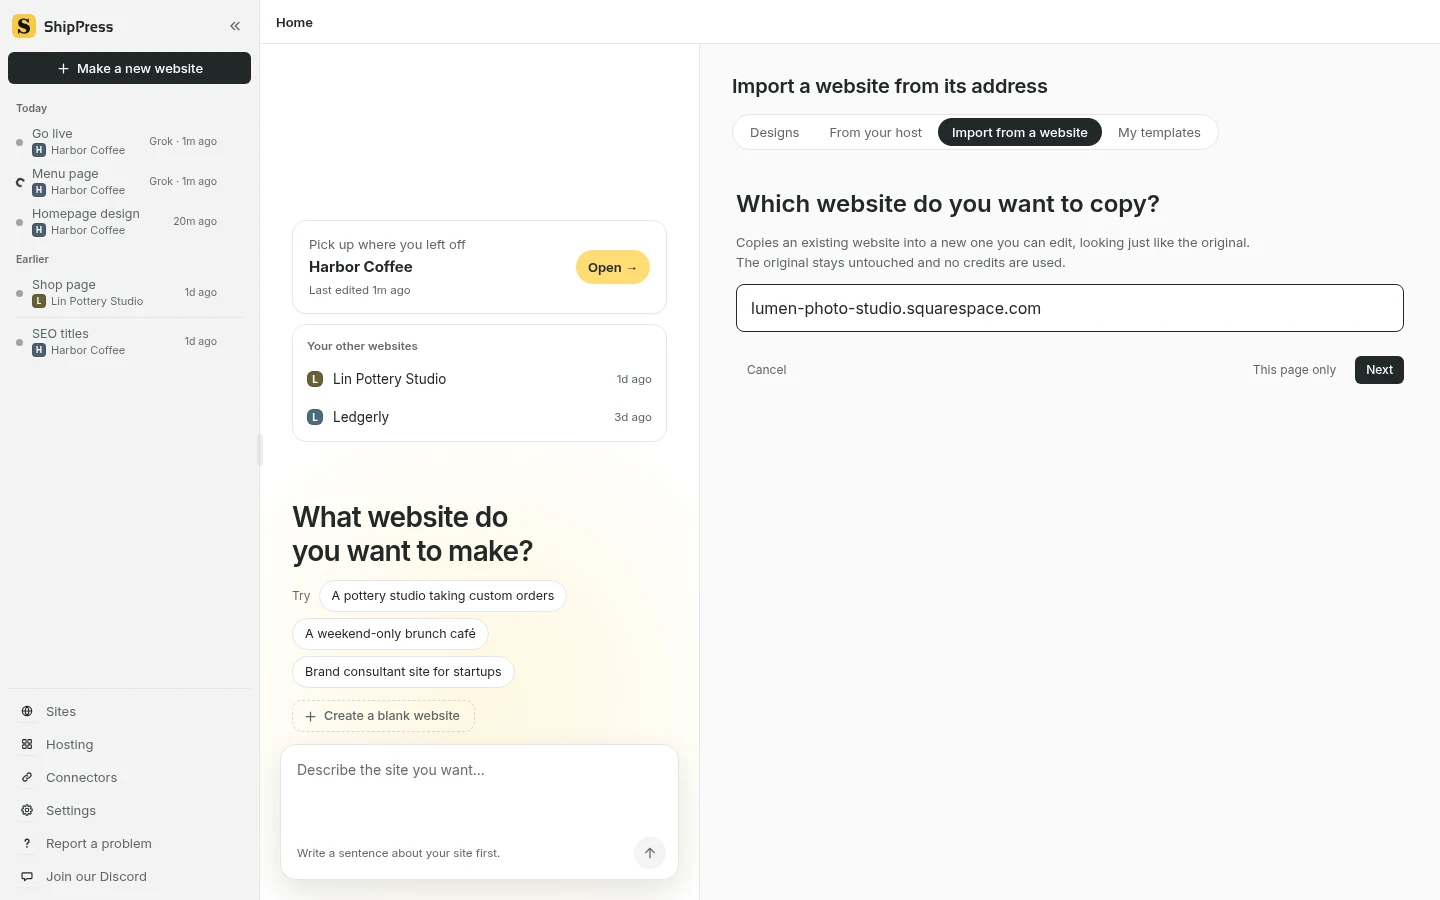
Importing a live Squarespace site in ShipPress using the Import from a website tab (English UI). -
Choose pages, posts, and products
ShipPress lists the discovered pages by title from your sitemap. The front page is always selected. You can click Pick all, Untick all, or Shift-click a range of items to choose what you want to bring over. When ShipPress detects a group of related items, such as blog posts, it asks whether you want them in their own category, as plain posts, as they are, or left out.
If ShipPress detects product pages with names and prices, it offers the option As WooCommerce products (… found, …) with the note: These products were detected from the page content. Please check the names and prices. Choosing this installs the WooCommerce plugin and brings over prices, pictures, categories, and variations. Subscriptions, reviews, and orders are not brought over, and product pages use WooCommerce's own layout between your header and footer. Taking live customer payments requires a WordPress host later (see our guide on WooCommerce stores). When ready, click Check it over, review the summary, and click Start import. Pages are processed in batches at roughly 30 seconds per page, so keep the app open while it runs.
-
Check the report before you cancel Squarespace
When the process completes, ShipPress presents a summary report. Check the report line: … pictures, videos and fonts saved; … still load from the original.
If the second number is above zero, those assets still load from Squarespace and will stop displaying once your old subscription ends. Within the import limits (up to 300 files, 40 MB per file, 250 MB total), any asset ShipPress could not fetch keeps its original URL. While your Squarespace site is still online, open those pages and replace those pictures using the chat assistant or in the WordPress Dashboard under Media. Click Show in the report to see any links still pointing to the original site. Forms on your pages are collected by the Imported Forms plugin. If you ever want to revert, open History and choose the restore point Before importing.
As an alternative for blog posts alone, WordPress has a built-in importer in the Dashboard under Tools › Import › WordPress that can read your downloaded .xml file. However, Squarespace warns that images might only transfer as links; avoid importing the same posts through both methods to prevent duplicates. Learn more in our overview of real WordPress.
-
Keep the look or pick a new design
ShipPress creates a theme based on your original layout, but you can also choose a fresh theme. Click the site menu at the top of the preview area and select Change this site's design… to browse available options.
When you click a design, a confirmation dialog appears: Your posts, photos and menus all stay, and the words on your other pages aren't changed. A restore point is saved automatically first, and your existing homepage text is saved as a draft named Home (previous design). Leave the checkbox Also add the new design's sample content unchecked so you do not mix template demo content into your imported pages. Click Use this design to apply it. If you change your mind, you can click Change back to the previous design. For design tips, see our articles on finding a design and editing by chat.
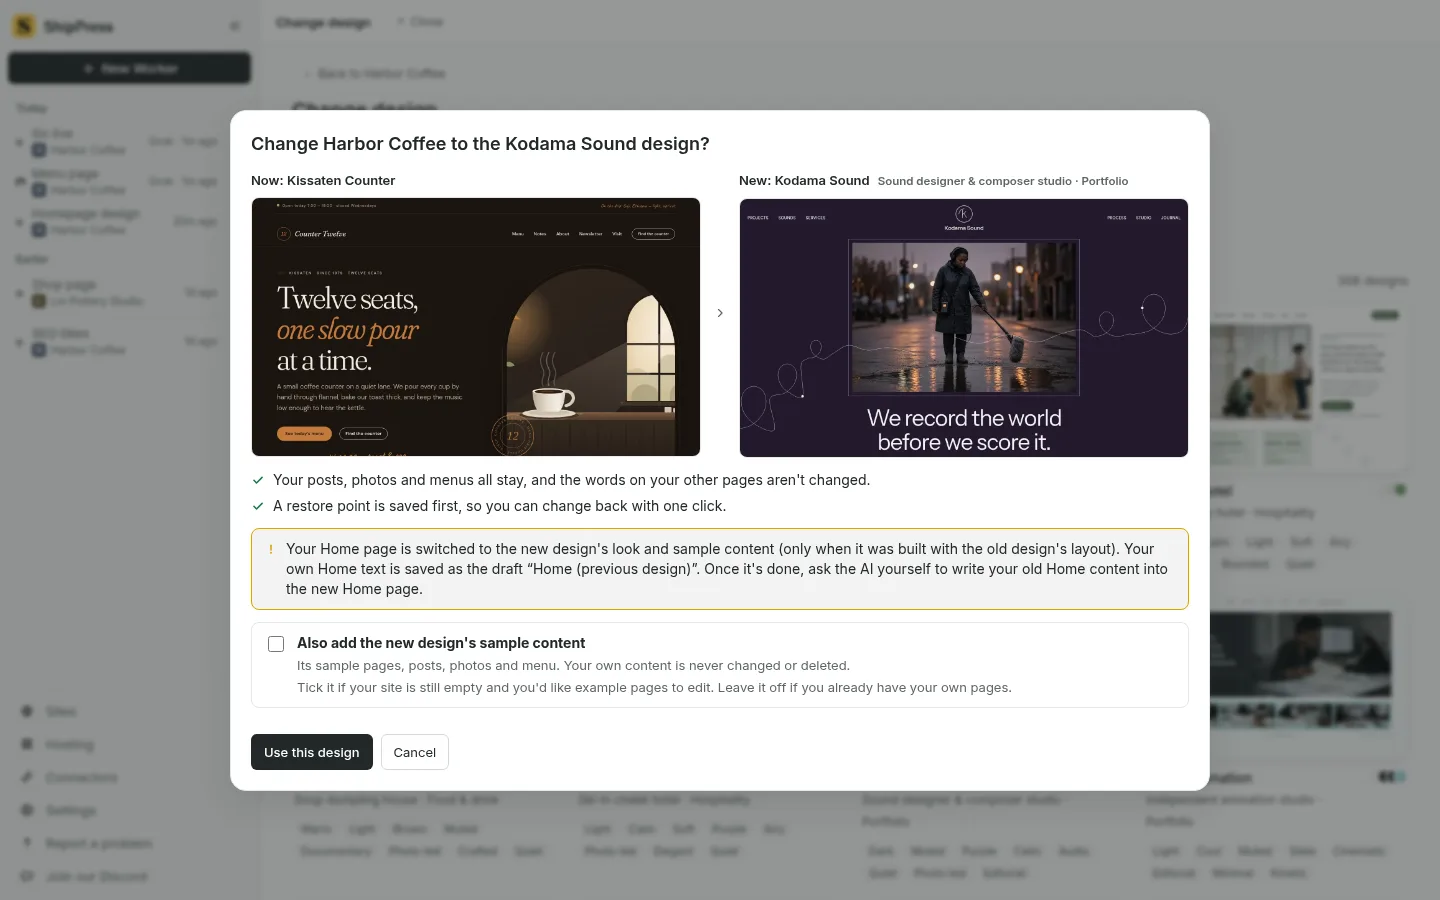
Choosing a new design with Change this site's design… in ShipPress: a restore point is saved first and your Home text is kept as a draft (English UI). -
Publish the new site
When you are ready to publish, click Go live in the top right corner. You will see three tabs: Free address, WordPress host, and Deploy yourself.
Under Free address, select ShipPress hosting. Enter your email address, enter the six-digit verification code, and click Put it on a free address. Your site will be published at an address ending in .workers.dev (you can publish up to five free-address sites per account). Form responses are emailed directly to you, and when you make updates later, Publish changes sends only the modified files. Keep in mind that a static free address cannot run a WooCommerce checkout or member logins; if you sell products, choose the WordPress host tab instead. For details, see our guides on publishing to a free address, going live, and choosing a WordPress host.
-
Point your domain at the new site, then cancel Squarespace
To connect your custom domain, go to Sites, select Address, and choose I already have an address. Enter your www address. ShipPress shows the DNS records to add at your domain provider (typically a CNAME record for www and a TXT record if needed). If your domain was registered through Squarespace, Squarespace is your domain provider, and you enter these records in your Squarespace domain DNS settings. You can also purchase a new domain directly inside the app. Search engines skip the free address, so connect your own domain (or buy one) to be found (see our guide on connecting your own domain).
Check your pages, links, and pictures on the live site thoroughly. Only after confirming that your new WordPress site works as expected should you cancel your Squarespace site subscription.
Related guides: Importing a website from its address, Moving from Ameba Ownd to WordPress, Move your Shopify store to WordPress and WooCommerce, and Daily backups.