
Cloudways: sign up and connect it to ShipPress with an Access Token
This is part 5 of our hosting series. On Cloudways you rent a managed cloud server and put WordPress sites on it. Get a server, create an Access Token, paste it into the ShipPress Mac, Windows & Linux app, then create a site from ShipPress and go live.
-
What ShipPress does with Cloudways
In ShipPress, the host description notes: “You pick the cloud (DigitalOcean, AWS, Google…) and Cloudways manages the server. Flexible, billed by usage; good when you have several sites or expect to grow.”
Once connected, ShipPress lists the WordPress and WooCommerce applications on your servers. You can add a new WordPress website to an existing server, go live with Everything, Files only, or Database only, and download sites back to your computer. Deployments and downloads run over SSH using the server's master credentials, which ShipPress retrieves through the API. Note that there is no signed-in WordPress admin ↗ button for Cloudways.
-
Sign up and launch a server
To get started, use the signup button below. You can compare cloud options and configurations on the Cloudways pricing page.
ShipPress never buys a server for you. You need to launch a server yourself in the Cloudways Platform. For a full walkthrough, refer to the official Cloudways guide on launching a server and adding an application.
If your account has no running server when you try to create a site, ShipPress alerts you that your Cloudways account has no running server, notes that ShipPress never buys one for you, and offers See plans on Cloudways ↗.
Sign up at Cloudways ↗The signup button above is an affiliate link: if you sign up through it, ShipPress may earn a commission, at no extra cost to you (details).
-
Create an Access Token
Cloudways uses Access Tokens for API authentication; the previous email and API key method ended on 15 October 2026. Only the primary account owner can create an Access Token. For official documentation, see the Cloudways guide on API Access Tokens.
- Log in to the Cloudways Platform.
- Open the profile menu at the top right, choose API Integration, and click Create Access Token.
- Enter an Access Token Name. Any label works, such as “ShipPress”.
- Choose an Expiration. Select the longest period available, because you will need to generate and paste a new token after it runs out.
- Select a Scope. Pick Limited Access and tick Server, Application, and Operation (the Lists permission is ticked for you). If you prefer a simpler setup, Full Access is the easy way.
- Click Create Access Token.
- Copy the token right away. Tick I have successfully copied the Access Token and click Done. The token is shown only once.
-
Paste the token into ShipPress
Now switch to ShipPress on your computer to complete the connection:
- In the ShipPress sidebar, click Hosting.
- Find the Cloudways row and click Connect. The link Make an API key on Cloudways ↗ opens the Cloudways API page in your browser if needed.
- Paste your token into API key (API token), where the placeholder shows Paste the Access Token you made in Cloudways Platform → API.
- Click Connect. ShipPress securely saves your token in your system keychain.
If Cloudways indicates that the token cannot list servers, create a new Access Token with Server, Application, and Operation ticked, or select Full Access.
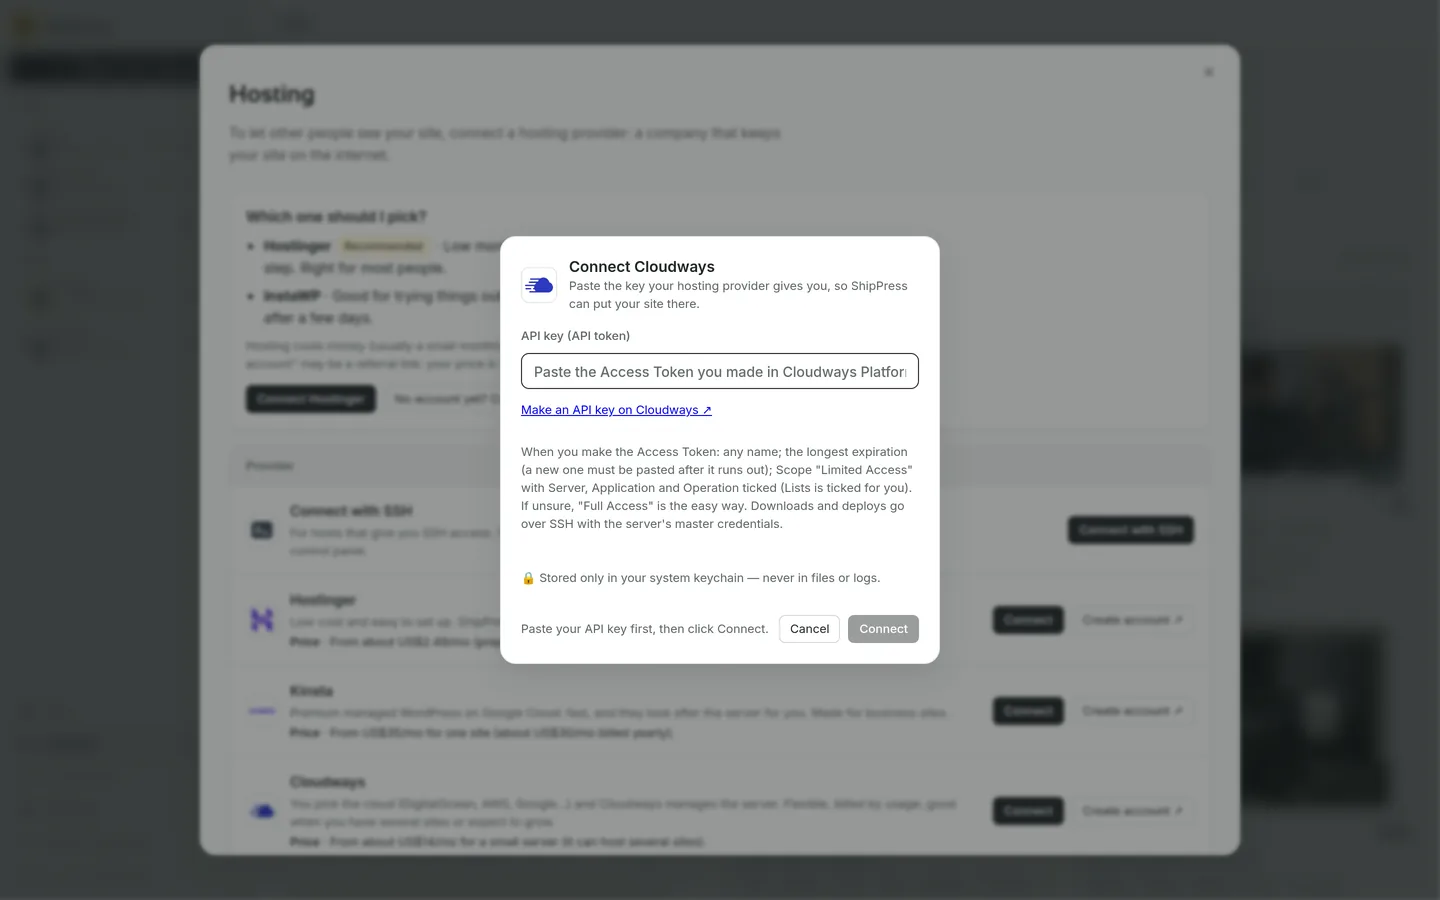
Cloudways now connects with an Access Token, not an email and API key. -
Create a website and go live
When Cloudways is connected, you can publish your local WordPress site directly:
- Open your site in ShipPress and click Go live.
- Choose the WordPress host tab and click Cloudways.
- If you have no site on Cloudways yet, click New website on Cloudways.
- Type a Site name (a friendly label such as “mysite”, not a domain name). If you have multiple servers, pick one under Which server. The dialog reminds you: The website is added to this server at no extra cost. Cloudways gives it its own address; connect your own domain later.
- Click Create website. Setting up the website takes a few minutes.
- Select your new site under Which web address and click Replace and go live. ShipPress transfers your files and database over SSH using the server credentials.
-
When the token runs out, and disconnecting
Access Tokens expire once their designated lifespan ends. When your token runs out, ShipPress will no longer be able to reach Cloudways. To restore access, generate a new Access Token in Cloudways, click Disconnect on the Cloudways row in ShipPress, and click Connect to paste the new token.
Clicking Disconnect removes the saved token and site associations from this computer while leaving your live websites running untouched. If you no longer need the token, revoke it on the Cloudways API Integration page.
Whenever you need to copy a live site back to your local setup, go to your connected sites and click Download to this computer. Read our tutorial on how to download a site from your host.
-
Next in the series
Explore the other tutorials in our hosting and deployment series:
- Next tutorial: Connect xCloud with an API token
- Previous tutorial: Connect Kinsta to ShipPress
- Series overview: Get a web host and connect it to ShipPress
- Deployment guide: Go live with your WordPress site
- Download guide: Download a site from your host