
How to turn your site into a WordPress static site
Running a WordPress site often brings constant plugin updates, login break-ins, and server costs. ShipPress for Mac, Windows & Linux turns WordPress into a static site: you build on your computer and publish a clean static copy online. You get the familiar editing experience while keeping WordPress, its database, and plugin code off the public web.
-
Why a WordPress static site needs far less looking after
When you run WordPress on a traditional server, the login page, PHP scripts, and MySQL database are constantly exposed to the internet. Hackers scan for
wp-login.php, try to exploit plugin vulnerabilities, or target outdated software. With ShipPress on Mac, Windows & Linux, WordPress, its plugins, and its database stay strictly on your computer.A static copy means ShipPress browses every page of your local website and saves it as pure HTML, CSS, JavaScript, and image files. Each page becomes its own folder with an
index.htmlfile, alongside a custom 404 page and an XML sitemap. None of the following exist online:- The WordPress admin dashboard (
wp-admin) and login page (wp-login.php) - PHP files, the database, and the REST API (
wp-json) - Background scripts like
xmlrpc.php,wp-cron.php, and feed files - Comment form handlers and shopping cart or checkout pages
Search boxes still work on your static copy: ShipPress generates a lightweight search index (
shippress-search.json) and a browser script that answers visitor queries right in the browser. While no website is 100% secure, a static site greatly reduces what can be attacked and maintained online. - The WordPress admin dashboard (
-
Check what your site needs before going static
Before turning your site into a static site, check whether its features can run without server-side PHP:
- Works: Standard pages, blog articles, images, navigation menus, custom fonts, your visual design, and site search.
- Contact forms: If you publish to the free ShipPress address, visitor form messages are automatically forwarded to your email address with zero configuration (learn about contact forms). However, on Spacefast or custom static hosting, traditional forms relying on PHP do not process submissions.
- Does not work: WooCommerce shopping carts and checkout pages, user registration, membership areas, and native WordPress comments.
If your local site uses WooCommerce, the Free address tab is disabled and ShipPress prompts you to choose a WordPress host. For online stores and dynamic membership sites, use the WordPress host tab in Go live (see Go live guide).
-
Bring your existing WordPress site into ShipPress
You can bring any WordPress website into ShipPress without touching or breaking your original live site:
- From your host: On the Home screen, click From your host. Connect your hosting provider (Hostinger, InstaWP, or any server over SSH; Hostinger downloads require SSH access) and click Download next to the site. ShipPress downloads a fresh working copy to your computer (download from host).
- Import from a website: Click Import from a website and paste your site's public URL. ShipPress crawls the pages, images, and fonts to reconstruct a clean WordPress site locally. Your live website remains untouched, and a "Before importing" restore point allows you to roll back anytime (import from URL).
- Start fresh: You can also choose ready-made layouts from Designs (start from a design).
-
Preview your pages and adjust them with AI chat
Once imported, open your site in the preview. Browse through the pages, check the navigation menu, and ensure images load properly.
If you spot typos, broken spacing, or outdated text, simply ask the AI Worker in the chat to adjust them (edit by chatting). You can also open the local WordPress admin dashboard to edit posts and settings before generating your static copy.
-
Choose where your static site files will live
When you are ready to publish, click Go live in the top right corner. The window offers three tabs: Free address, WordPress host, and Deploy yourself.
The Free address tab is for static sites only. Check the Where the static site goes section:
- ShipPress hosting (default): Enter your email address to receive a six-digit verification code. No password is required. Click Put it on a free address to publish to a free address ending in
.workers.dev(up to 5 free sites per account). Form submissions are e-mailed to you, search works, and ShipPress only uploads files that have changed (free publishing details). - Spacefast: Automattic's publishing platform for static sites. Enter your Spacefast API key to publish directly to a Space (publish to Spacefast).
If you only want the files, open the third tab, Deploy yourself. Under Static web files (Plain web files you can put on any host.), click Download static files. A window titled Download the static copy saves the folder, which you can put on Netlify, GitHub Pages, or Cloudflare Pages (host on Netlify).
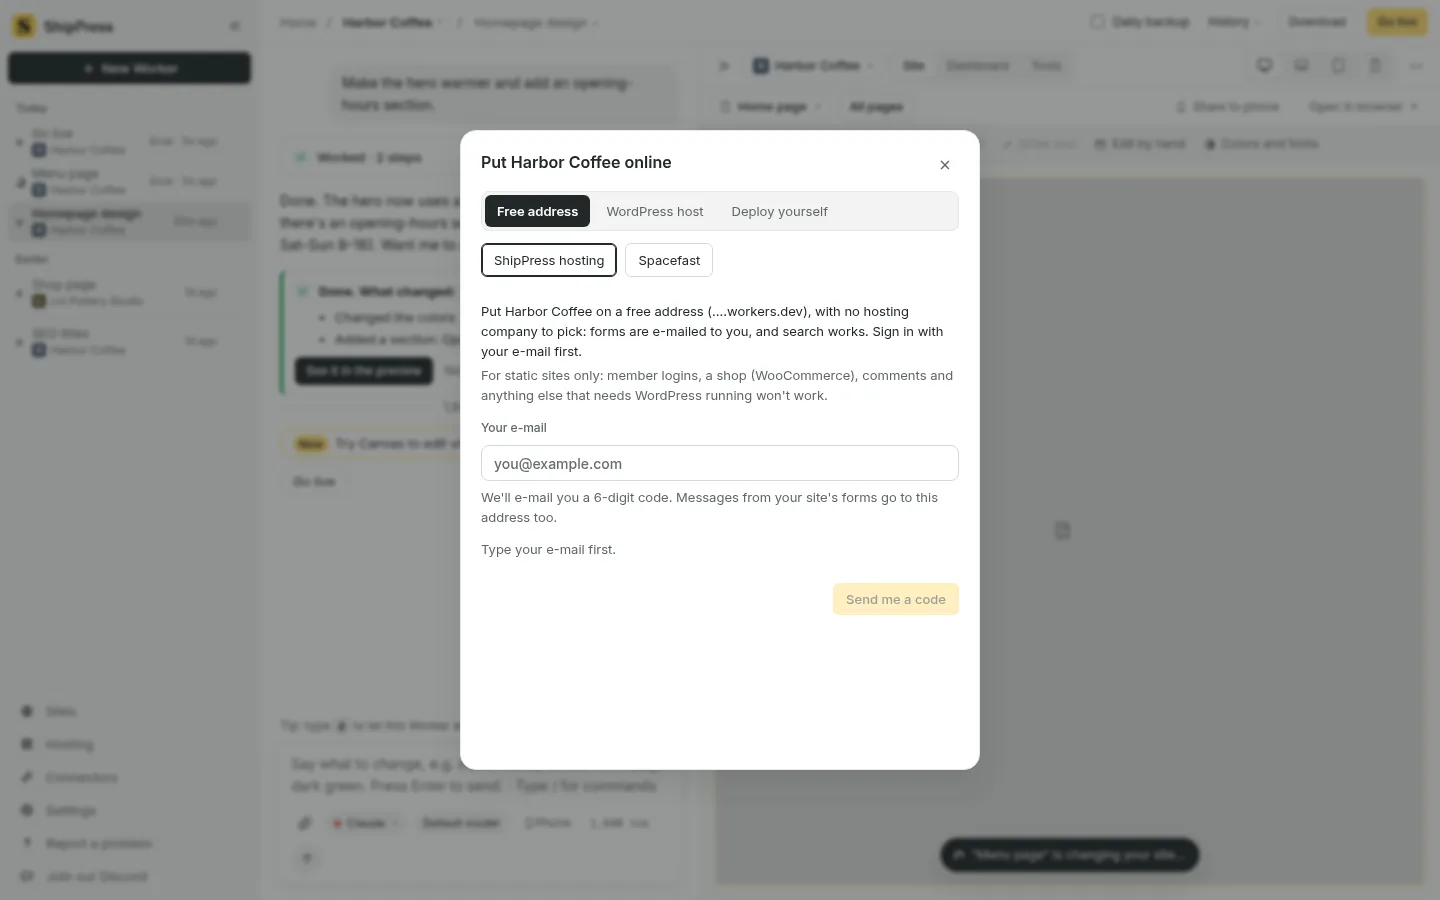
Free address: pick ShipPress hosting or Spacefast, then sign in with your e-mail. 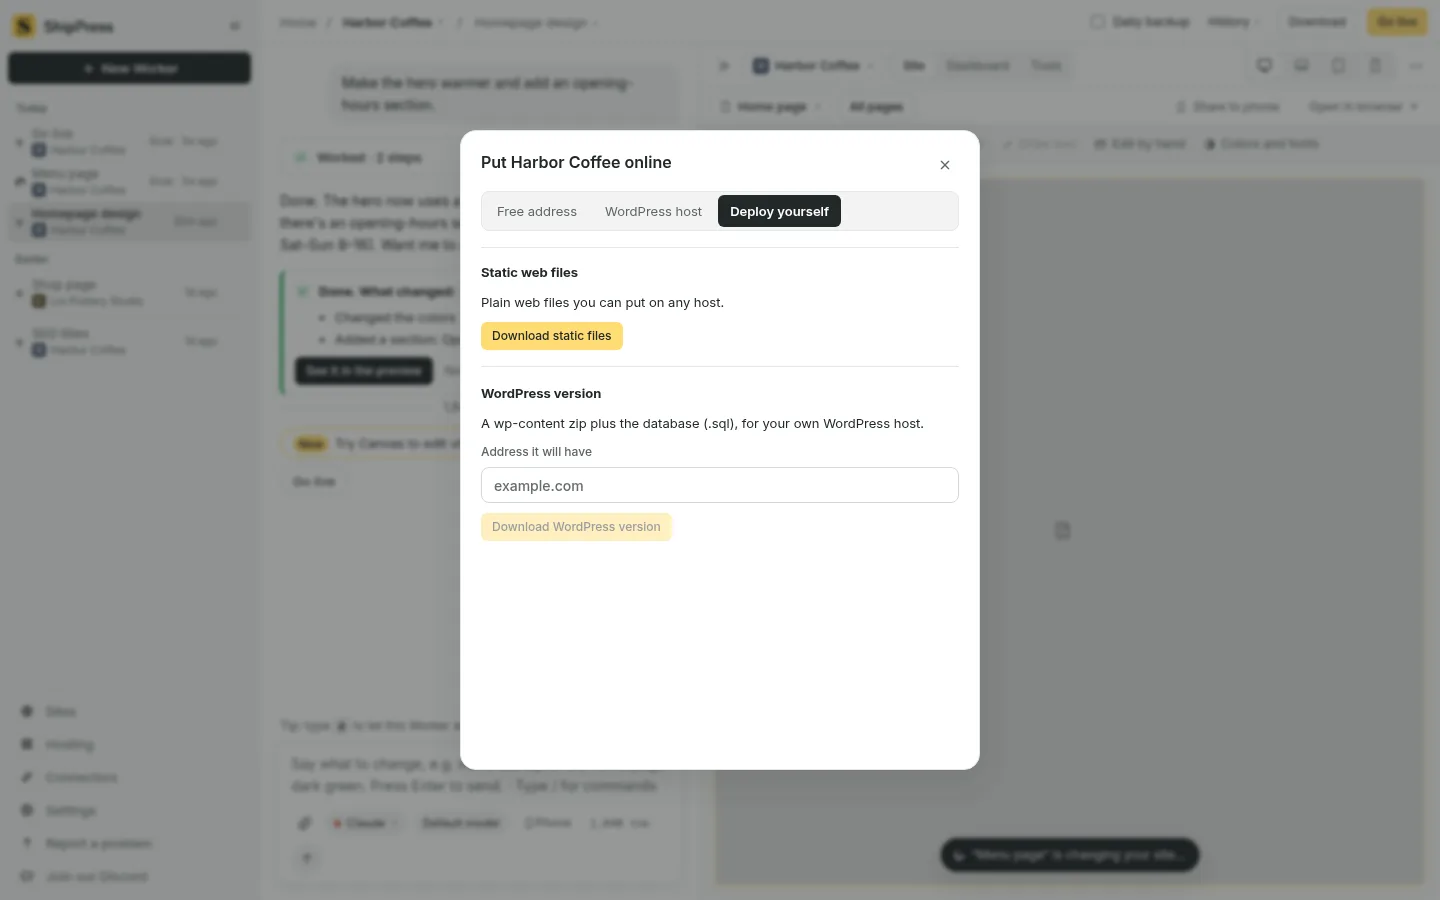
Deploy yourself: Download static files saves the plain web files for Netlify, GitHub Pages or Cloudflare Pages. - ShipPress hosting (default): Enter your email address to receive a six-digit verification code. No password is required. Click Put it on a free address to publish to a free address ending in
-
Let ShipPress check the copy before uploading
Before any file is uploaded to the internet, ShipPress runs an automated pre-flight scan of your static export to catch common errors.
If a critical problem is found, the upload stops immediately, displaying Nothing was uploaded. Fix these first: along with a checklist. Examples include an active WooCommerce shop that requires PHP, a local address left in a page, forms configured to submit to PHP on unsupported hosts, or files that exceed size limits.
Minor notices appear under Worth a look:. For example, a link pointing to the local WordPress dashboard will be flagged because external visitors cannot access it. These warnings do not halt your upload, giving you full control.
-
Connect your own custom domain name
A static website published to the free
.workers.devaddress displays a Trial badge, and search engines intentionally skip indexing it. When you are ready for public visitors and SEO traffic, connect your own domain.In the sidebar, open Sites and click Address on your site's row. You can connect a domain you already own for free (enter it with
wwwin front) or purchase a new domain directly inside ShipPress, bundled with one year of ShipPress hosting (connect your domain). -
Keep your site updated and roll back when needed
Whenever you need to update content, edit locally on your Mac, Windows & Linux computer using the AI chat or the WordPress dashboard. When finished, open Go live and click Publish changes. ShipPress compiles the static files and only uploads the specific files that changed, keeping deployments fast.
On the free address, the Earlier versions list shows your deployment history. If an update introduces an error, click Go back to this one next to an earlier build to roll back your live website quickly. You can also turn on Daily backup for the site on your computer (daily backups).
Related tutorials: explore guides on contact forms, how to export and move sites, and read our overview of website safety.