
Add a contact form to your website
In ShipPress for Mac, Windows & Linux, you add a contact form to your website by chatting with the AI Worker. On a free ShipPress address, forms work with no setup: no mail server, no SMTP, and every message is e-mailed to you. Other ways of going live behave differently, and this page shows how.
-
Ask the AI to add a contact form to your website
To get started, open your site and chat with the AI Worker. Tell it what you need, for example:
Add a contact form with name, e-mail and message to the Contact page.
In an empty chat (Simple mode) you will also see the ready-made request Add a contact page. Clicking it only fills the message box with Add a contact page with a contact form., so you can change the text before you send it (see Add a new page and put it in the menu by chatting). The AI Worker then creates the page or updates your existing content as requested (see Edit your site by chatting).
-
Allow the plugin install on your site
A fresh site may not have a form plugin installed yet. In that case, the AI Worker will offer to install one from WordPress.org (for example: Your site has no form plugin yet. I'll install Contact Form 7 (free, from WordPress.org) and add the form to your Contact page.). The AI chooses how to build the form, so it may not always choose Contact Form 7 or require a plugin.
Before any plugin is installed on your local computer, an approval card appears in the chat asking ShipPress wants to change your site: followed by install the plugin “contact-form-7” from WordPress.org and Allow?. You can click Details to view the command (
wp plugin install contact-form-7 --activate). A note reminds you: Not sure? Choose “Not now” and nothing changes.Click Allow to proceed. If you click Not now, nothing runs and the card says Nothing was changed. If you do not answer within 10 minutes, the request expires and nothing runs either. If you allow the change but change your mind later, click Undo this change to roll back to the previous restore point (see Undo any AI change with restore points). Note that restore points protect the database, custom themes, and uploads, but downloaded plugin files remain on disk and can be deactivated or removed under Plugins in your Dashboard.
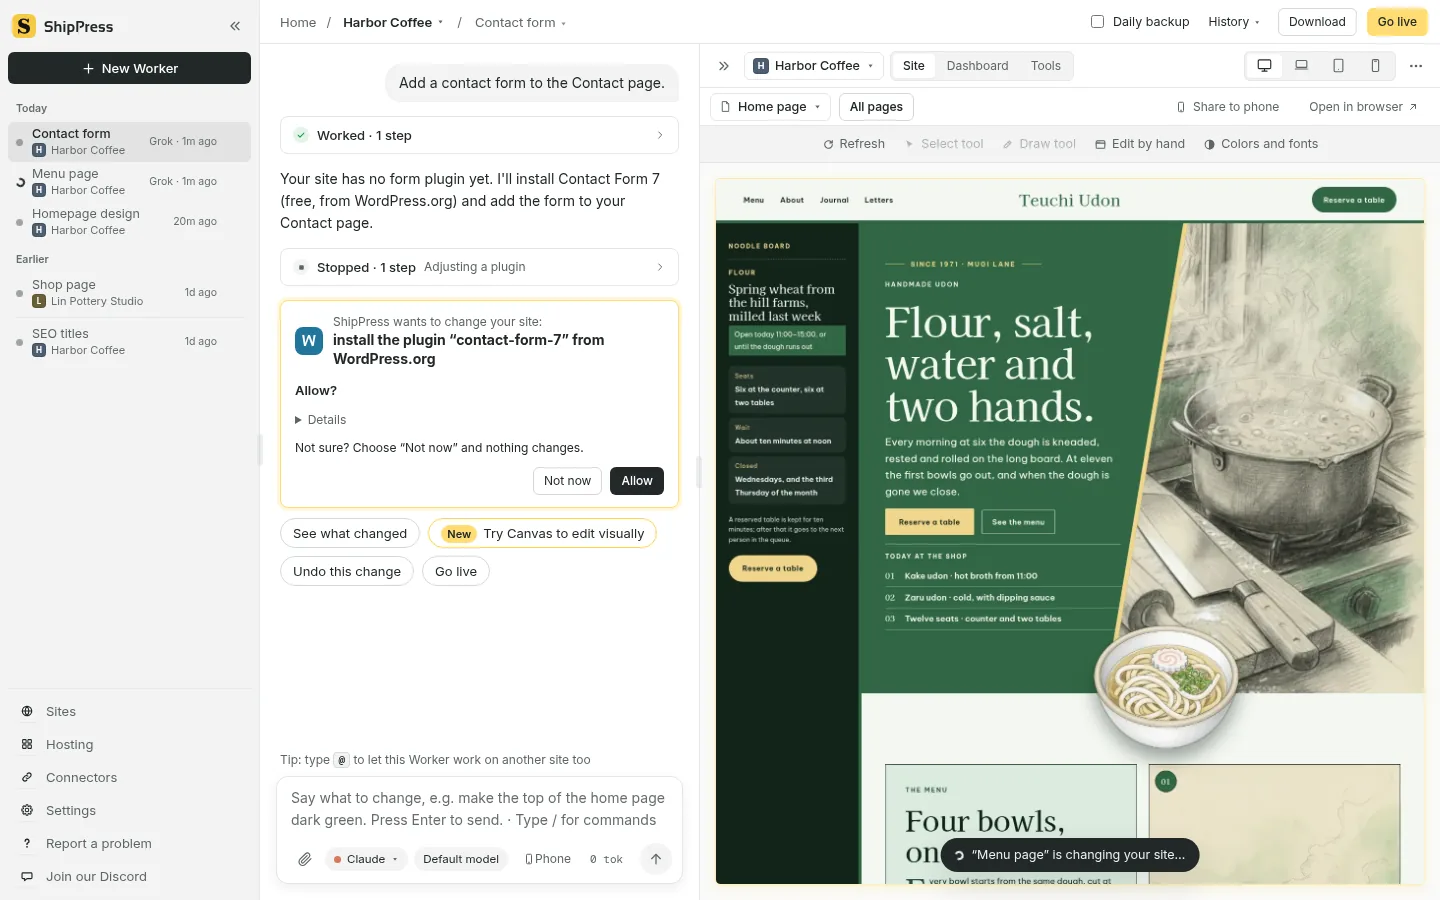
ShipPress asks for your permission before installing any plugin on your local computer. -
Check the form in the preview and adjust the email field
Once the AI finishes, check how the form looks in the local preview on the right. You can ask the AI Worker to adjust fields, labels, button text, or colors anytime through chat.
Sending messages is something you test on the live site (step 6). Here is an essential tip for the e-mail field: if you use a free ShipPress address, the notification email uses the visitor's address for Reply-To only if the field is named exactly
email(case does not matter). The default field in Contact Form 7 is namedyour-email, which does not trigger direct replies. Ask the AI: Name the e-mail field “email”. That way, you can reply directly to visitor inquiries from your mail client. -
Where messages go depending on how you go live
Where visitor submissions go depends entirely on how your site goes live:
- Free ShipPress address (Go live → Free address → Put it on a free address): Recommended for small businesses and beginners. It works with zero setup. Every message is sent straight to your account email without needing SMTP plugins (see Publish your site free with a ShipPress address and Give your site its own domain).
- Spacefast and static copies: If you export a static copy or deploy to Spacefast, forms that require PHP do not work. For a static copy, ShipPress alerts you: Some pages have forms that need PHP to send, which a static copy can't receive: (see Put your site on Spacefast and Download your static site and put it on Netlify for free).
- WordPress host (Go live → WordPress host): When hosted on providers like Hostinger, the site is a standard WordPress install. The form plugin functions through your web host's standard mail services (see Go live and Get a web host and connect it to ShipPress).
-
How the free ShipPress form service works
When you publish to a free ShipPress address (a
*.workers.devsubdomain or your custom domain), You need no plugin mail settings. When you publish, ShipPress points every form using the POST method to its built-in form backend and embeds Cloudflare Turnstile anti-spam protection. Standard search forms (GET) and forms pointing to external services remain untouched.Submissions are automatically routed to the email address you signed in with for free hosting. You do not need to configure any recipient settings. To prevent abuse, each site can receive up to 100 messages per month and roughly 10 messages per minute. Each submission can contain up to 30 fields, up to 5,000 characters per field, and approximately 20 KB in total size. File attachments are not supported. If a form includes a hidden
_gotchahoneypot field, spam bots receive a fake success message while no email is dispatched. -
Send a test message and hit reply
Once published, open your live website in a browser to test the form. Fill out the fields and submit. The visitor sees Sending… followed immediately by Sent. Thank you! (or Your message couldn't be sent right now. Please try again later. if an issue occurs), and the form inputs clear automatically.
Check your email inbox. You will receive an email with the subject New message from <your site address> (or a custom subject if configured with a hidden
_subjectfield). The email neatly lists every field submitted. If the e-mail field is namedemail(step 3), the e-mail's Reply-To is the visitor's address, so you can simply click Reply in your mail app to write back. -
Track monthly messages on the Sites page
To see how many messages your free-hosted site has received, click Sites at the bottom of the sidebar. In the Online section, locate your site under ShipPress free hosting (see Manage your sites and free up disk space).
Under the site status (such as Trial and Last published), the row displays your current monthly usage: Form messages this month: 3 of 100. If your site reaches the 100-message monthly limit, ShipPress sends you a notification email (Your site's form reached 100 messages this month). After reaching the limit, visitors see the unable-to-send notice until the counter resets on the 1st of next month (UTC).
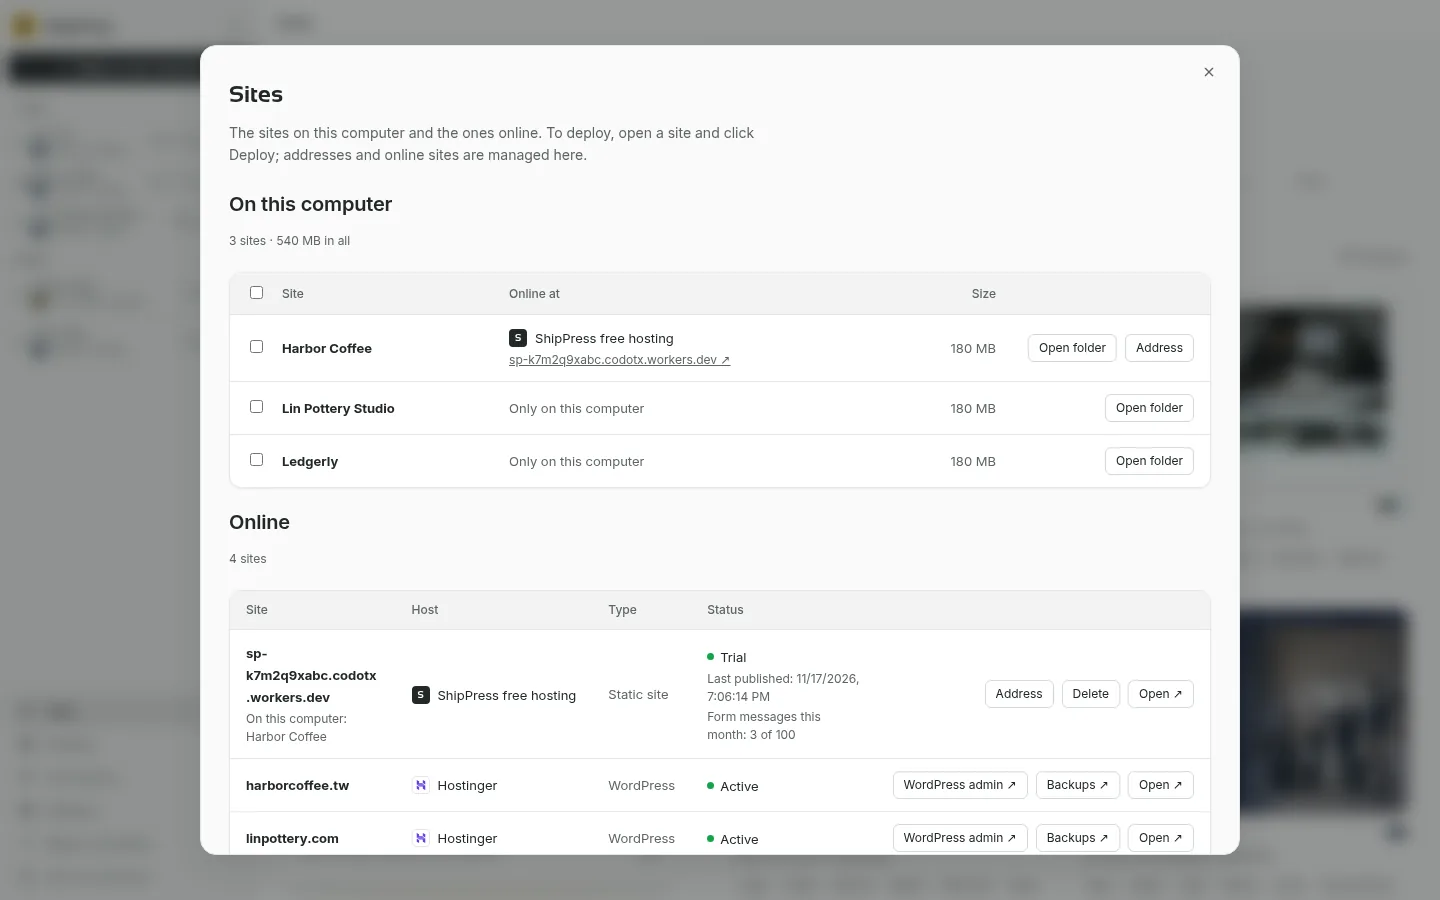
The Sites page displays monthly form submissions alongside publication status and address management. -
Imported sites, host troubleshooting, and next steps
If you imported a site from an existing URL (see Import a website from its address) that already had forms, ShipPress automatically installs a companion plugin called Imported Forms. This plugin logs submissions under Form entries in the Dashboard and forwards them to the site administrator. You can disable this behavior anytime under Plugins, which leaves the forms visible on pages while disabling submission.
If you deploy to a WordPress host and find that the form's e-mails do not arrive, check your spam folder first, review the form plugin's mail configuration, or consult your host's email delivery guides.
- Publish your site free with a ShipPress address: Put your site online with zero-setup forms.
- Give your site its own domain: Connect your custom domain to a free-hosted site.
- Go live: Deploy your WordPress site to live hosting.
- Import a website from its address: How forms on an imported site are kept and e-mailed.
- Undo any AI change with restore points: Back up and revert AI changes safely.