
SiteGround: sign up and connect it to ShipPress with SSH
This guide is part 3 of our series on connecting a web host to ShipPress. SiteGround connects to ShipPress over SSH with a key you make in SiteGround’s Site Tools. Get a plan, set up a WordPress site there, make an SSH key, connect it in the ShipPress Mac, Windows & Linux app, then go live.
-
How SiteGround connects
In ShipPress, SiteGround is described as “Long-established WordPress hosting with caching and free SSL built in,” with the tagline “WordPress hosting · connects with SSH.” SiteGround does not use a direct account sign-in or an API key. Instead, clicking Connect opens the Connect with SSH dialog with SiteGround’s details already filled in, including the name SiteGround, port 18765, and signing in with a Key file.
The row in the app displays: SiteGround connects with SSH: once connected, your site shows up in the Connect with SSH card. Over this SSH connection, ShipPress can go live with Everything, Files only, or Database only, download the live site back to your computer, and run WP-CLI commands on the live site. Because ShipPress cannot create a website on SiteGround for you, you set up your WordPress website at SiteGround first.
-
Sign up and set up a WordPress site
Use the signup button below to create your account if you do not have one yet. You can compare available plans on the SiteGround WordPress hosting page.
Next, set up a WordPress site in SiteGround’s Client Area. For step-by-step guidance inside SiteGround’s dashboard, refer to their official tutorials on starting a new website and installing WordPress.
ShipPress connects to an existing WordPress installation, so ensure your target directory on the server contains WordPress and its
wp-config.phpfile.Sign up at SiteGround ↗The signup button above is an affiliate link: if you sign up through it, ShipPress may earn a commission, at no extra cost to you (details).
-
Make an SSH key in Site Tools
To establish a secure SSH connection, follow the official SiteGround SSH connection guide:
- In Site Tools, go to Devs → SSH Keys Manager.
- Under Add new, choose Generate, give your key a name, and enter a passphrase.
- Find your key under Manage SSH Keys, click Actions → Private Key, copy the private key text, and save it as a file on your computer (such as inside your
.sshfolder). Keep this file private. On Mac, SiteGround suggests runningchmod 600on that file. - In the Manage SSH Keys list, open the key menu (⋮) and choose SSH Credentials to view your hostname, username, and port.
ShipPress displays this same guidance in its setup hint: In SiteGround Site Tools → Devs → SSH Keys Manager, make a key and download the private key file. The SSH Credentials on the same page show the hostname, username and port (usually 18765).
-
Connect SiteGround in ShipPress
- In the ShipPress sidebar, click Hosting.
- On the SiteGround row, click Connect. The Connect with SSH dialog opens with SiteGround preset.
- In Server address, enter the hostname from your SSH Credentials, and enter your Username.
- Keep Port at 18765 unless your SSH Credentials indicate a different port.
- Keep Sign in with set to Key file.
- In Private key file (on this computer), choose your saved key file (such as a path in
~/.ssh/on Mac orC:\on Windows). - Enter your passphrase in Key passphrase (if it has one) if your key has one.
- Enter the WordPress folder on the server. The app hint notes: The WordPress folder is usually ~/www/<your domain>/public_html.
- Click Test connection. When ShipPress prompts Is this the server you expect?, confirm the fingerprint matches and click Yes, it's my server.
- When all checks pass, click Done.
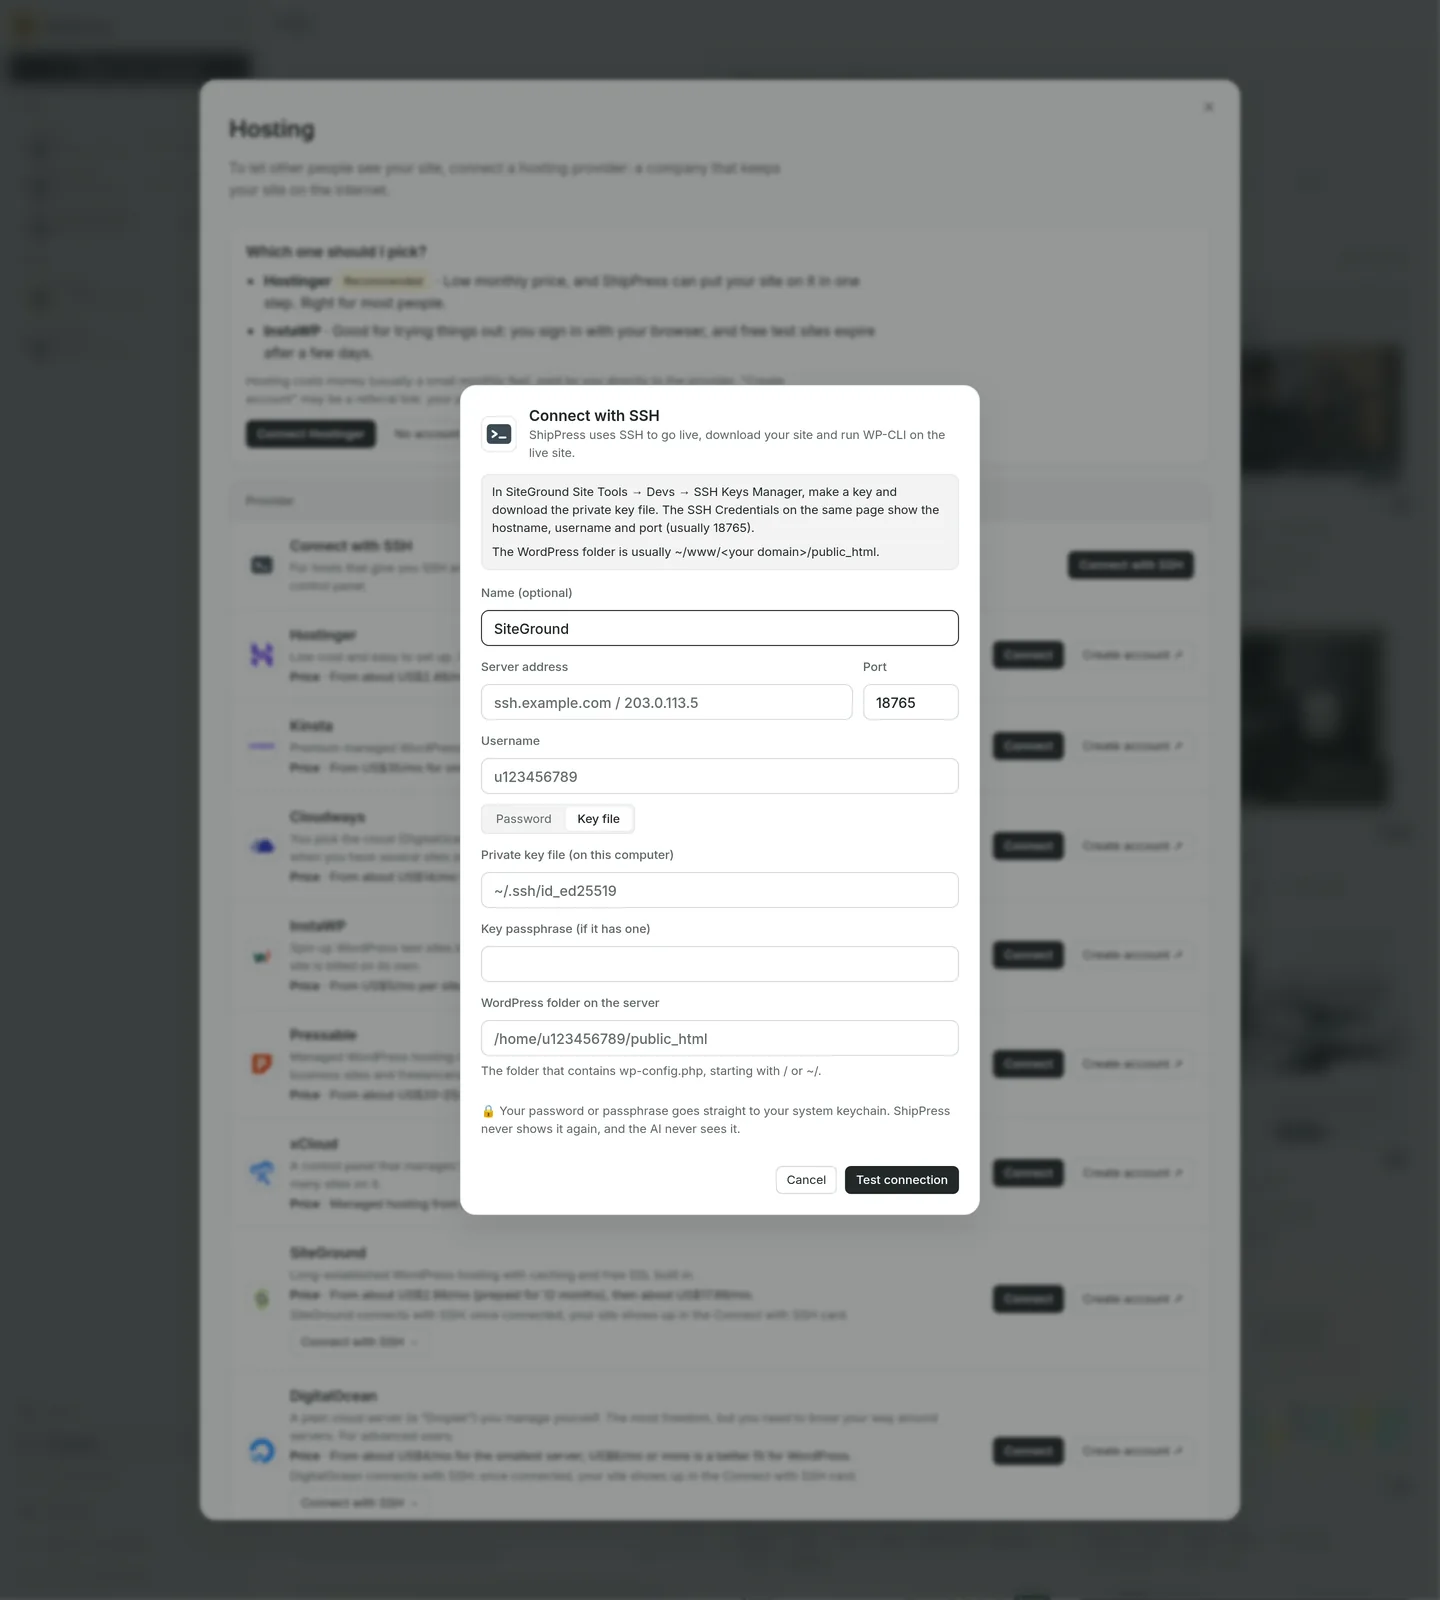
SiteGround connects with an SSH key from Site Tools. The usual port is 18765. -
Go live
When you are ready to publish your site:
- Open your website in ShipPress and click Go live.
- Switch to the WordPress host tab. Your saved SSH connection appears as the SSH button.
- Under Which web address, choose your SiteGround site address.
- Click Replace and go live. Before replacing files and content, ShipPress saves a copy of the live database to your computer.
Whenever you make changes to your local site later on, click Go live again to push the updates to SiteGround.
-
Manage the connection
Your saved connection is listed inside the Connect with SSH card on the Hosting page. On that card, you can use three actions:
- WP-CLI: run WP-CLI commands directly on your live site. Any commands that make modifications will ask for your explicit approval before executing.
- Test again: verify that your server credentials and WordPress path are still working properly.
- Disconnect: remove the saved SSH credentials from ShipPress on this computer without touching your live website.
If you need to sync changes from your live server back to your computer, read our guide on how to download a site from your host. If you ever stop using this connection, click Disconnect in ShipPress and delete the key in SiteGround’s SSH Keys Manager.
-
Next in the series
Continue with our hosting guides and deployment resources:
- Next part: Kinsta: connect with an API key
- Previous part: InstaWP: connect your sandbox
- Series overview: Get a web host and connect it to ShipPress
- Going live: Go live
- Downloading your site: Download a site from your host