
Give your site its own domain
Once you have published a site with a free ShipPress address, you can connect your own custom domain for free or buy a brand new one directly inside the Mac, Windows & Linux app. Search engines skip the free address; your own address or a bought domain lets you go fully live. If you have not published yet, see Publish your site free with a ShipPress address first.
-
Before you start
This guide is for a site you have already published on a free ShipPress address (
….workers.dev). If you haven't published yet, follow Publish your site free with a ShipPress address first.A free address displays a Trial badge, and as the app notes, Search engines skip the free address. Connect your own address or buy a domain to go fully live. You have two ways to add your own address:
- You already own a domain: connecting it is completely free.
- You don't have one: you can buy a domain directly in ShipPress, paid together with a year of ShipPress hosting.
Each account can have up to five sites on a free address, and a site with your own address or a bought domain doesn't count.
Keep in mind the same limitation as the free address: your live site is a fast static copy. It does not support dynamic features like a WooCommerce store, member logins, or WordPress comments. If you need those dynamic features, see Publish to a WordPress host.
-
Open Sites and click Address
In the sidebar, click Sites. Under Online, you will see your site listed with ShipPress free hosting. Click Address on that site's row. (The site's row under On this computer also has an Address button.)
Right after publishing, the Go live window also mentions: Addresses are set in Sites: connect one you have, buy a domain, manage DNS. with a Go to Sites → button that takes you straight there.
The dialog opens with the title Address of example.workers.dev and displays Address now: example.workers.dev. Below that, you will see two choices:
- I already have an address — Free. Add one record at your domain provider to connect it.
- I don't have one; buy one — The domain and a year of hosting are paid together; it's connected automatically.
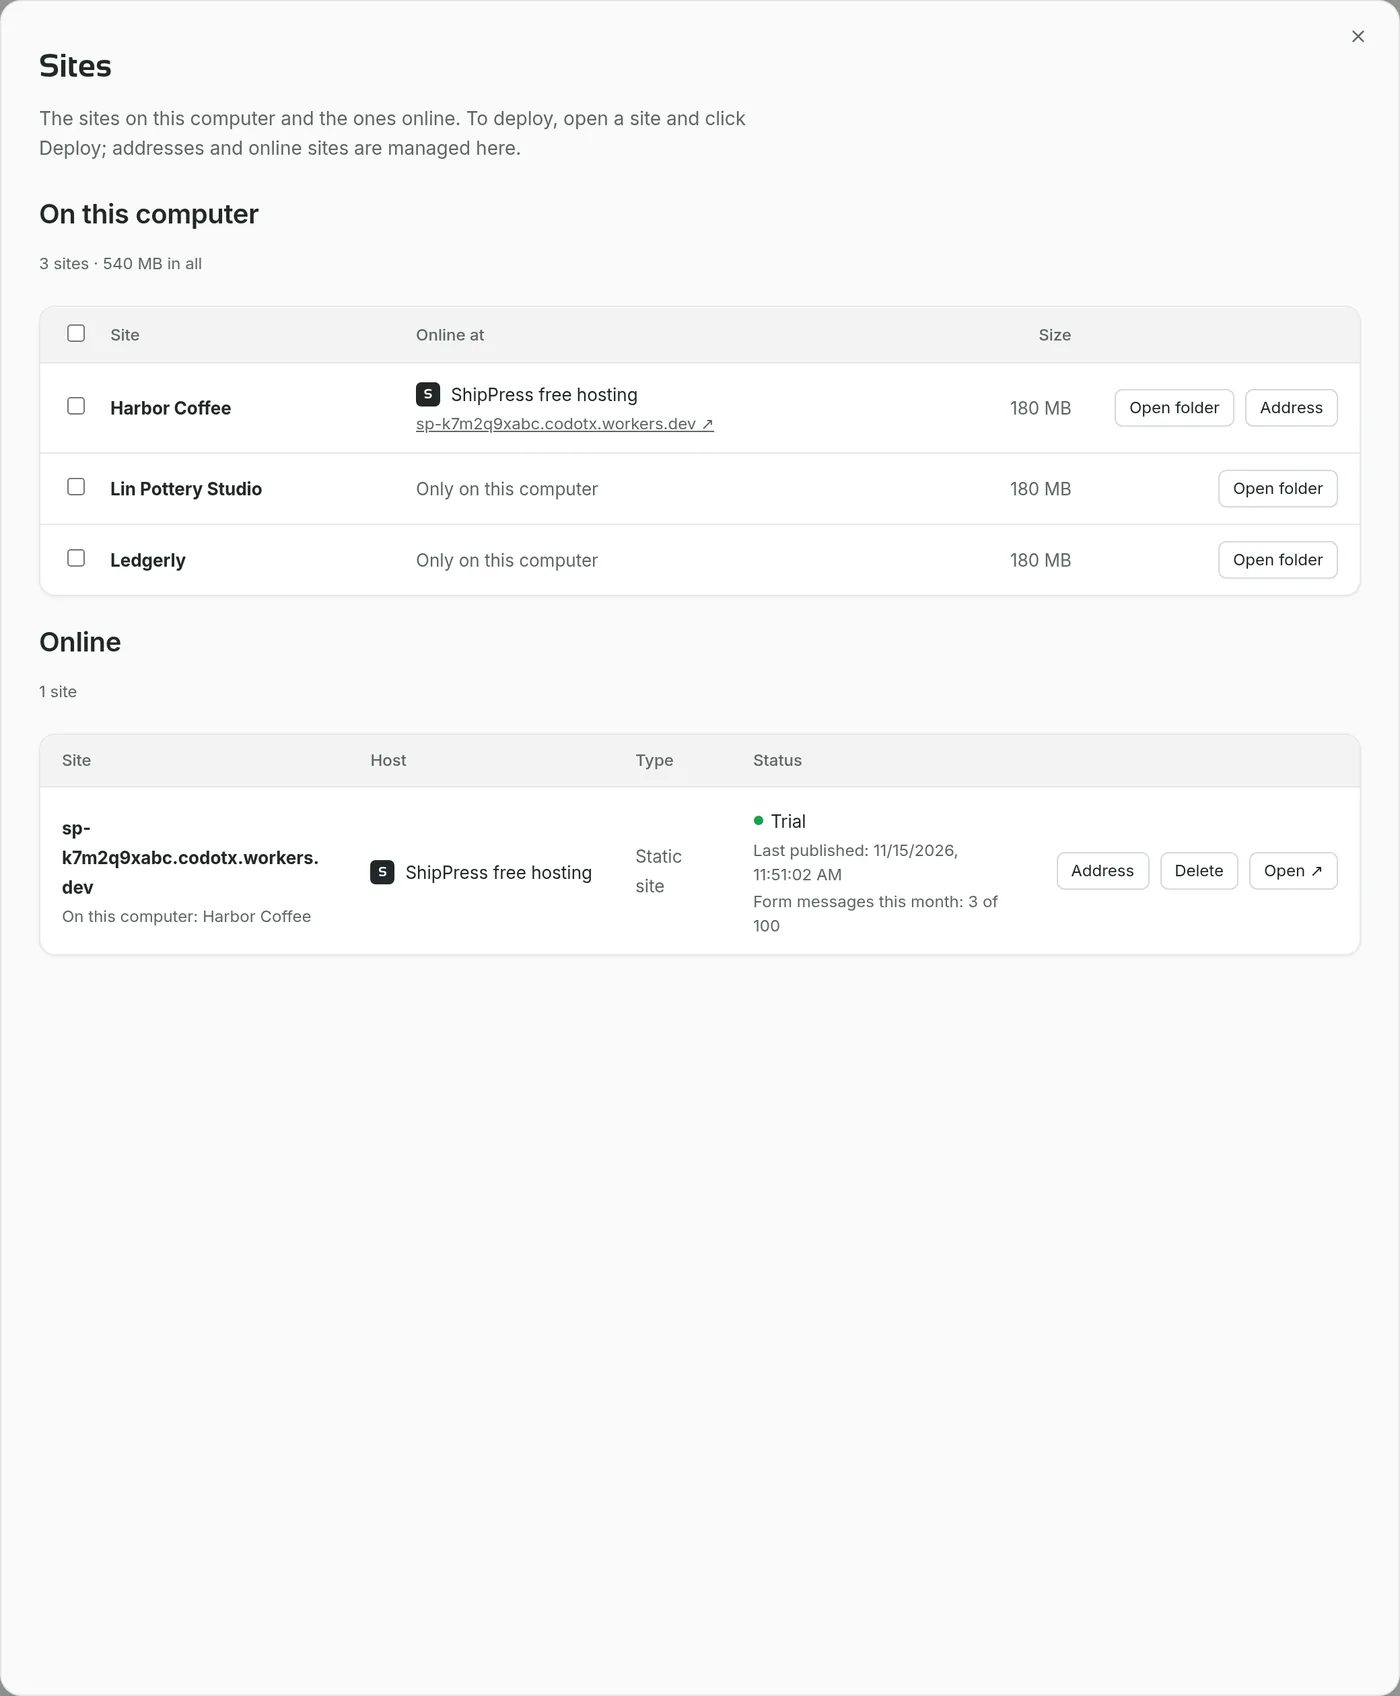
Open Sites and click Address on the site that is already on a free ShipPress address. -
Connect an address you already have
Select I already have an address. Under Your address, type your domain with
wwwin front, such aswww.example.com.The app shows this helpful hint: Use the address with www in front. It's free, the address stays yours, and ShipPress doesn't change your domain's settings.
A bare root domain like
example.comis not accepted. If you enter one, ShipPress asks you: Use the address with www in front (www.example.com). At your domain provider, set the bare domain to forward to www.Once you have entered the
wwwaddress, click Connect this address.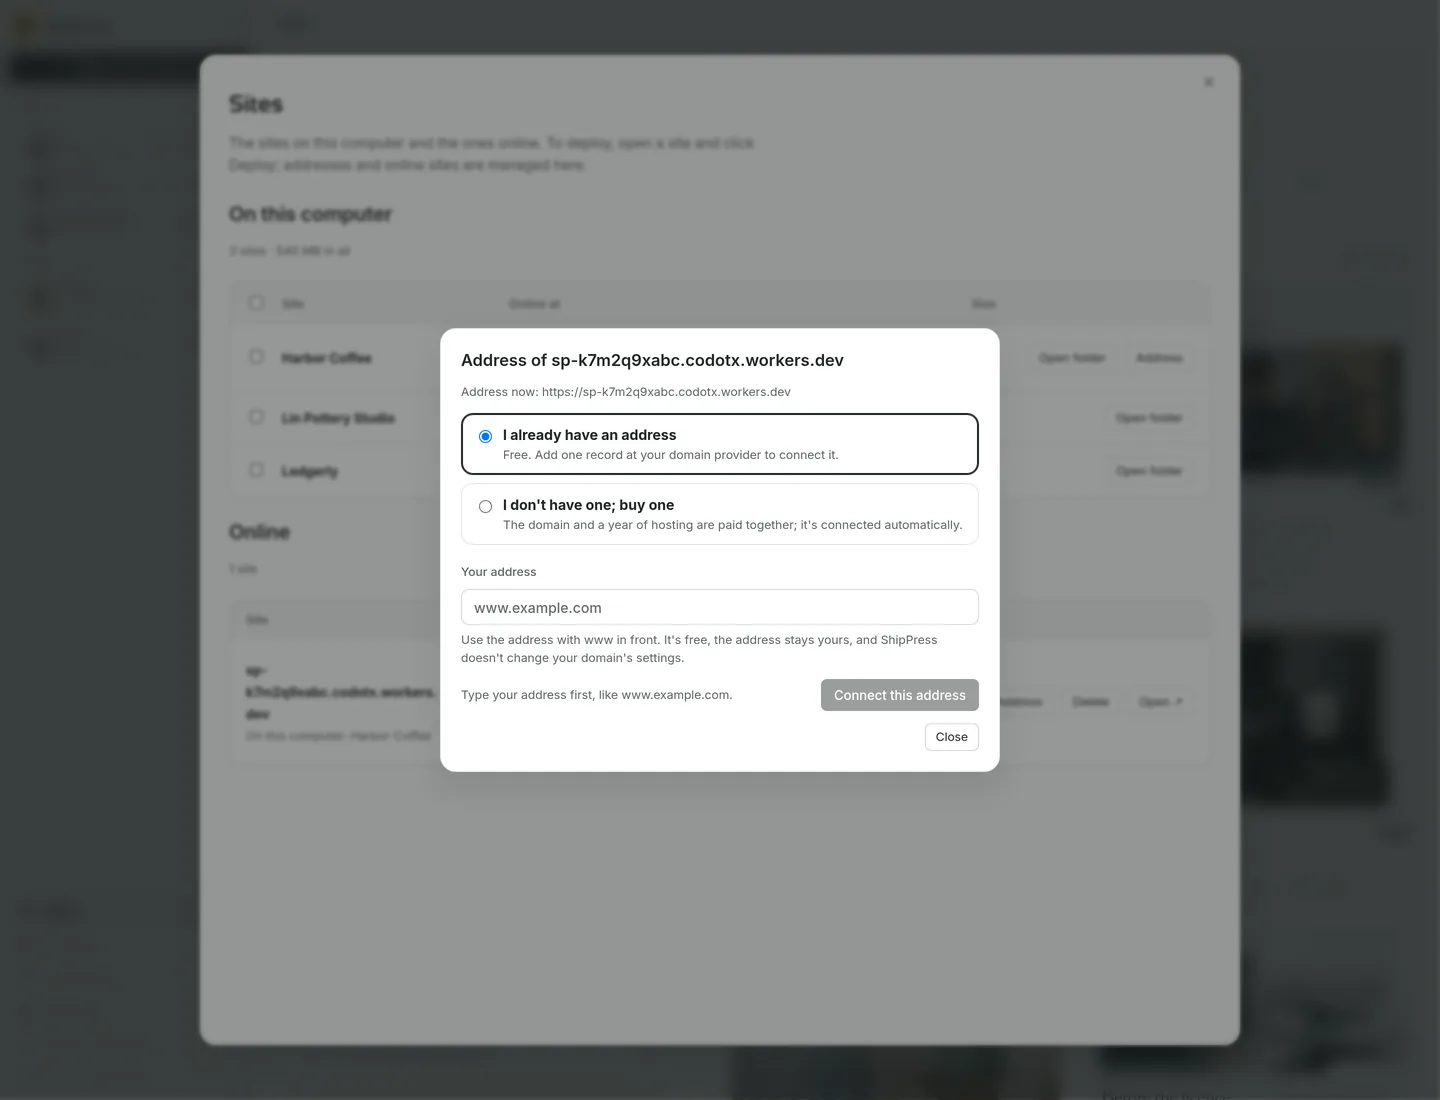
Choose I already have an address and type the name with www in front. -
Add the records at your domain provider
ShipPress displays Add these records at your domain provider alongside instructions: Where you bought the domain (GoDaddy, Namecheap, Cloudflare…), open the DNS settings of www.example.com and add the records below. It usually works within minutes, at most a day; ShipPress checks by itself.
You will see a table with Type, Name, and Value, along with a Copy value button next to each entry. This usually requires one CNAME record for your
wwwaddress, plus an additional TXT record if Cloudflare asks for one to verify ownership.Log in to the account where you purchased your domain (such as GoDaddy, Namecheap, or Cloudflare), open its DNS management page, and add the records exactly as listed. ShipPress never changes your domain's DNS settings for you.
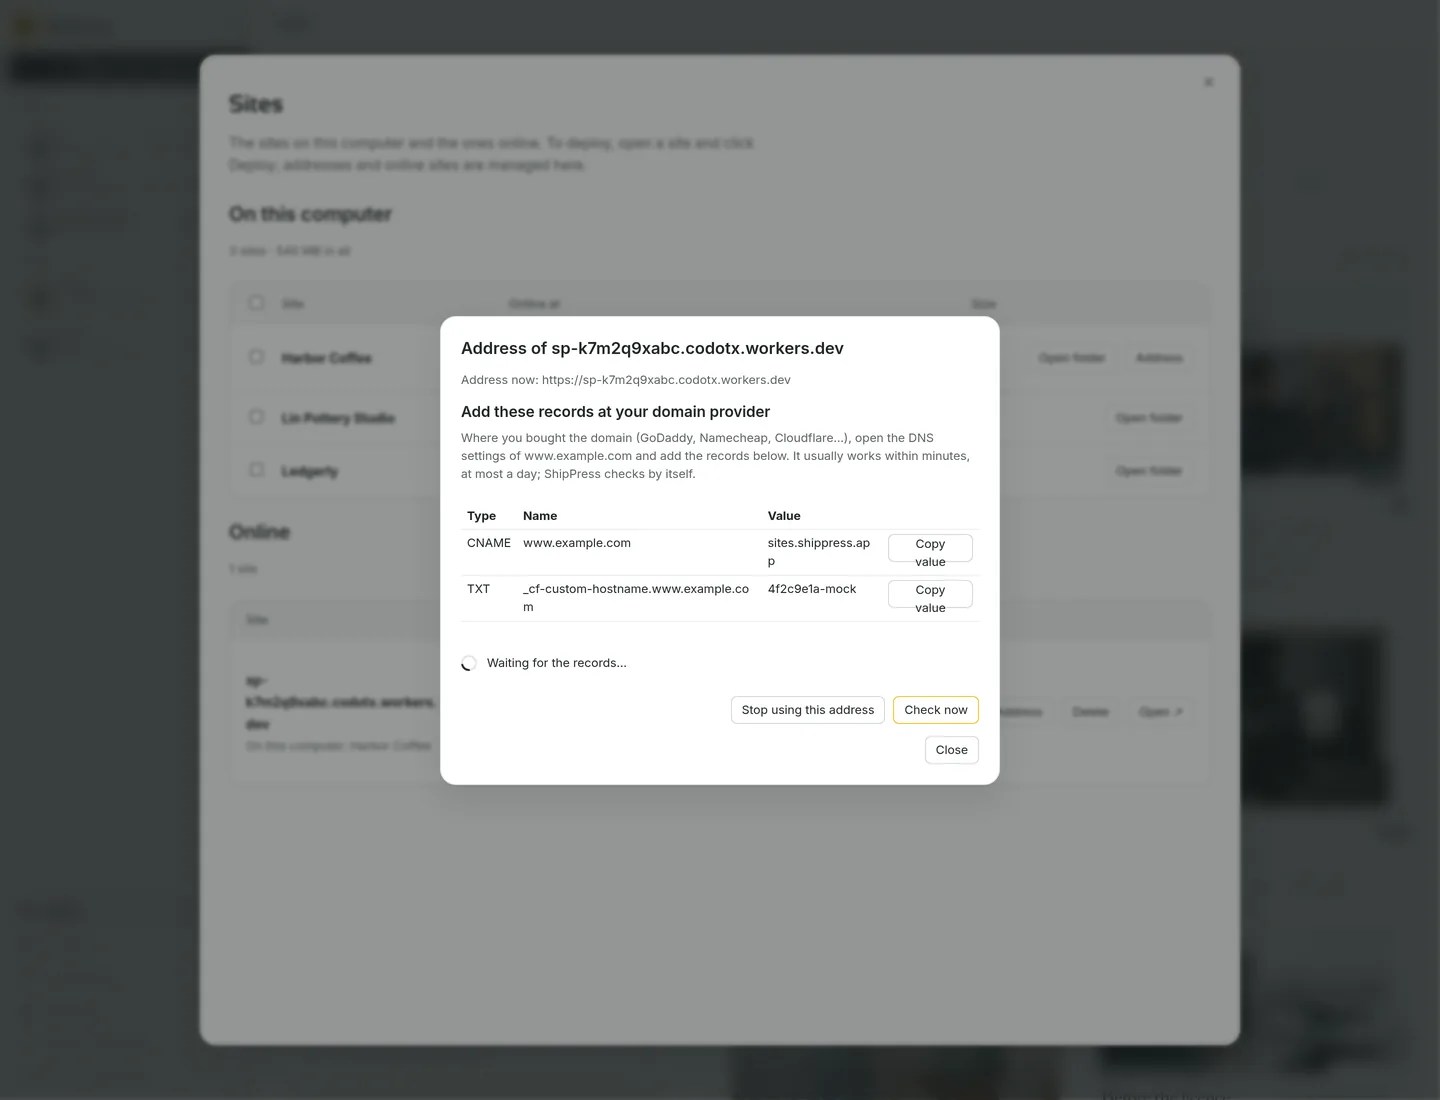
Add the records at your provider. ShipPress waits and checks them for you. -
Wait for it to go live
DNS changes usually take only a few minutes, though some providers can take up to a day. While the dialog stays open, ShipPress displays Waiting for the records… and checks automatically about every 20 seconds. You can also click Check now at any time to test immediately.
Meanwhile, in the Sites list, the site's row shows Address being set up.
As soon as the DNS records are verified, the dialog displays Connected to www.example.com, with HTTPS.
If this site is currently open in ShipPress, it updates right away: you will see Publishing again with the new address, so every page links to it… followed by Published again with the new address. If another site is open, your pages will be updated to link to the new address the next time you deploy.
-
Or buy a new domain
If you don't already own a domain, select I don't have one; buy one. Under The name you'd like, enter your desired name (such as
mybakery) and click Look up.Each result displays either Choose with the yearly price before tax, Taken, or Not offered here. If you want to try something else, click Pick another name to search again.
When you click Choose, a summary card appears titled Domain + ShipPress hosting, paid once a year. It clearly breaks down your costs:
- Domain (first year)
- Hosting, form e-mails, certificate (one year)
- Subtotal (before tax)
Applicable sales tax or VAT depends on your location; Stripe's checkout page will calculate and show the exact final total with tax. Each year thereafter, renewal costs roughly the same (based on the domain's registry price at that time), and ShipPress will e-mail you a payment link 45 days before the year ends.
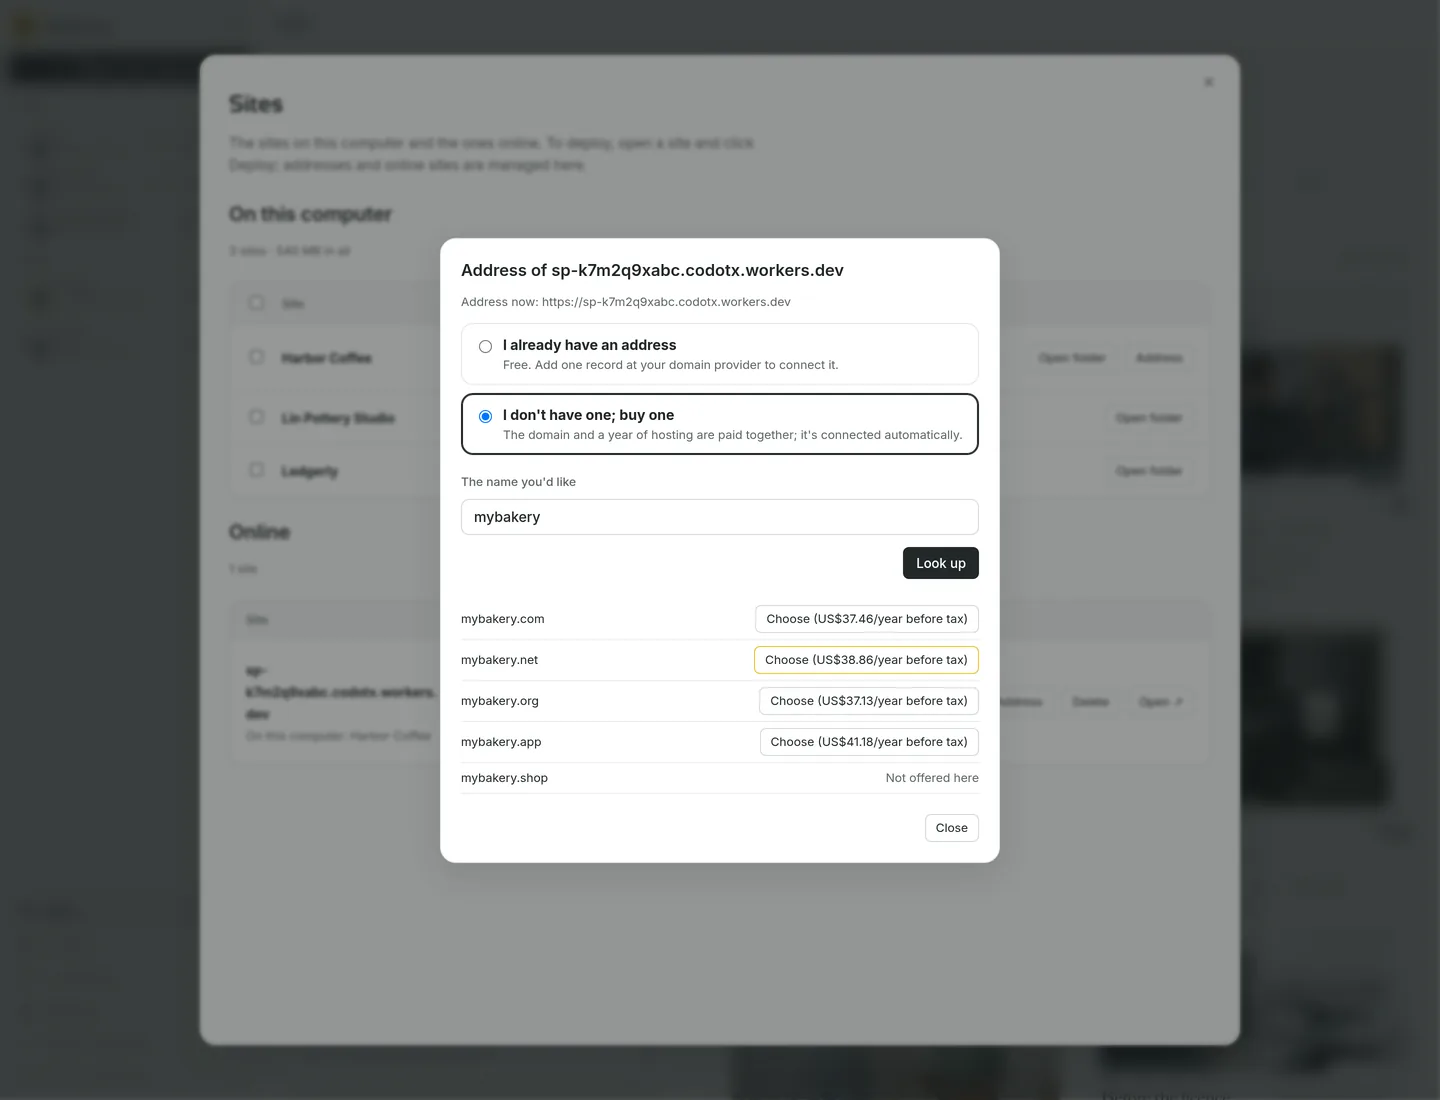
Look up the name you want, then choose a result that is available. -
Read the terms and pay on Stripe
Before paying, review the key registration conditions listed on the card:
- Once registered, a domain can't be refunded.
- If you pay but the domain can't be registered, you get a full refund automatically.
- If the renewal isn't paid, the site goes offline when it ends and the domain expires.
- The domain is registered in Codotx's name. To move it to another registrar, e-mail support.
- After registration, you will receive an official ICANN verification e-mail asking you to confirm your contact details. You must click the confirmation link in that e-mail, or the domain gets suspended.
Check the box that says I've read and agree to the above and the terms of service, then click Pay.
As the dialog notes, You pay on Stripe's page. ShipPress and the AI never see your card. While you complete checkout, ShipPress shows Waiting for you to pay on Stripe's page….
Once payment succeeds, ShipPress automatically handles the setup: registering the domain (usually takes a few minutes), connecting your site, and testing that it loads properly. When finished, it confirms with Done: your site is on example.com. and provides an Open example.com ↗ button. There is nothing else you need to configure.
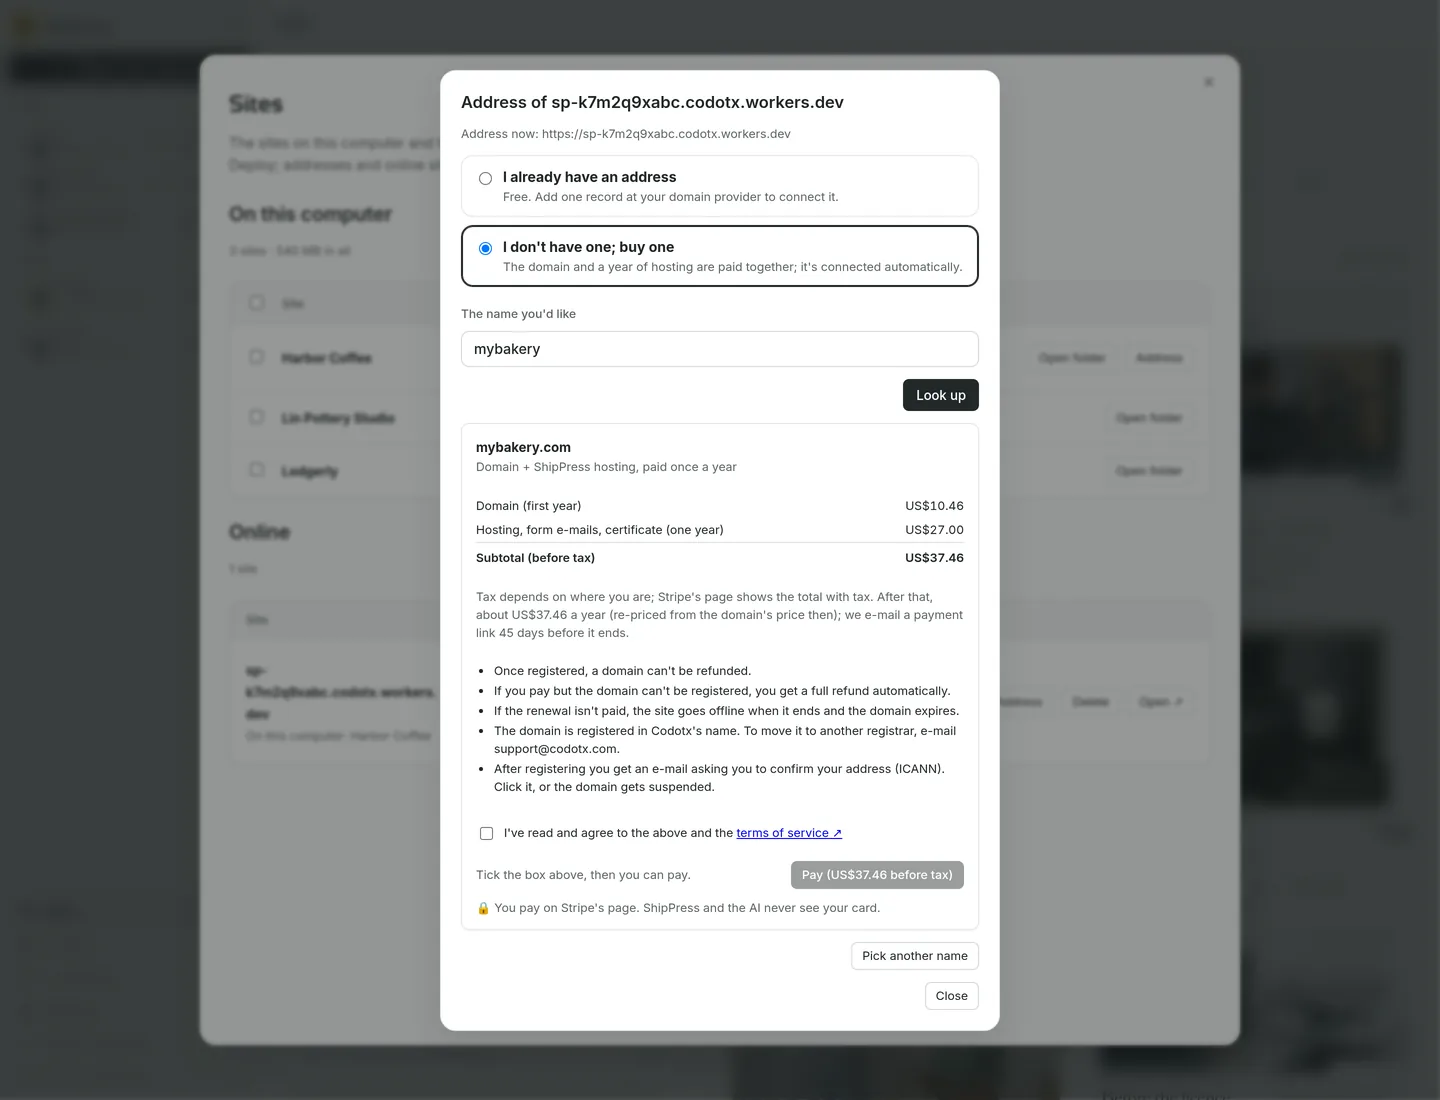
Read the terms, tick the box, then pay on Stripe's page. -
Manage DNS, or stop using the address
If you bought your domain through ShipPress, opening Address displays its DNS records under the heading: DNS records of example.com. The ones with a lock keep your website online and can't be changed.
You can add records for other services (such as TXT verification records or MX records for custom e-mail) by clicking Add record. You can also edit other entries or click Delete to remove them. When a change might affect your site's connectivity, ShipPress asks Make this change? and warns that e-mail or your website may stop working if the record is incorrect. Click Make the change only when you are certain.
If you connected a domain you already own and want to disconnect it, click Stop using this address. When the confirmation prompt asks Stop using this address?, click Stop using it. Your domain provider's DNS settings remain untouched, so remember to log in to your domain provider and remove the CNAME record as well.
Similarly, clicking Delete on an online site in Sites disconnects the custom address; make sure to delete the corresponding CNAME record at your domain provider afterwards.
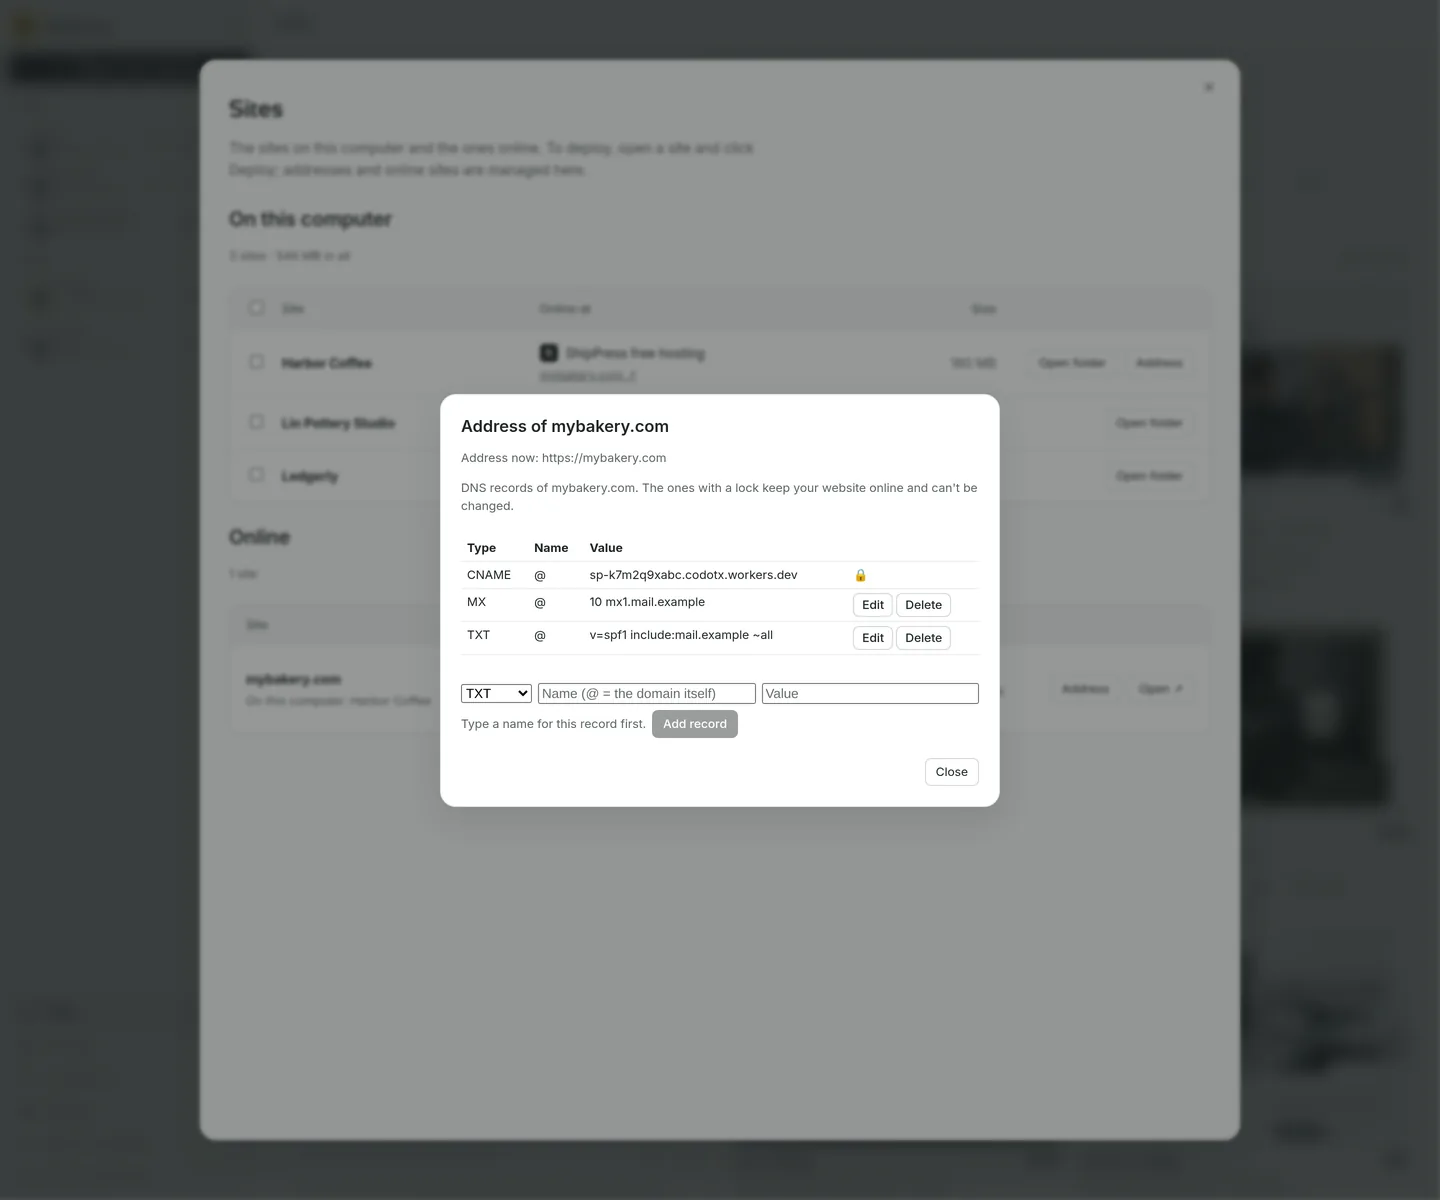
Records with a lock keep the site online and can't be changed. -
Where to go next
Other ways to put your site online, or to move it:
- Publish your site free with a ShipPress address — Put your site online on a free .workers.dev address with no hosting company, then publish changes in one click.
- Put your site on Spacefast — Publish a static copy of your WordPress site to Spacefast using your own API key.
- Go live — Pick a host and a web address, then confirm. Nothing is public before that.
- Download your static site and put it on Netlify for free — Save your site as plain web files, drop the folder on Netlify, claim it to keep it, or use GitHub Pages or Cloudflare Pages instead.
- Your site is yours: export it and move it to your own host — Where your site lives on your computer, how to save a static copy, and how to move the full site to a host you choose.