
Pressable: sign up and connect it to ShipPress
This is part 7 of our hosting series. Pressable is managed WordPress hosting run by Automattic. Get a plan, create an API application in MyPressable, paste its Client ID and Client Secret into the ShipPress Mac, Windows & Linux app, then create a site and go live.
-
What ShipPress does with Pressable
ShipPress describes Pressable as: “Managed WordPress hosting run by Automattic, the company behind WordPress. Fast, with real support; good for business sites and freelancers.”
When connected, ShipPress lists your Pressable sites, can add a new WordPress site to your plan, and deploys your changes over SSH. Under More options, you can send Everything, Files only, or Database only. You can also download sites back to your computer over SSH. There is no signed-in WordPress admin button for Pressable.
-
Sign up and pick a plan
To get started, use the signup button below. You can compare plans on Pressable’s pricing page.
A site you create from ShipPress counts toward your plan’s site limit. ShipPress uses your existing account and never buys a new plan for you.
Sign up at Pressable ↗The signup button above is an affiliate link: if you sign up through it, ShipPress may earn a commission, at no extra cost to you (details).
-
Create an API application
To connect ShipPress, you need to create an API application. Following Pressable’s official guide, here are the steps:
- Sign in to MyPressable.
- Go to User Settings → API Applications.
- Click Create New API Application.
- Give it a name and choose its permissions.
- Confirm to generate your credentials. Pressable displays a Client ID and a Client Secret.
Only the account owner can create API applications; collaborators should ask the owner to generate them. Do not share these credentials, as they grant access to your sites.
-
Paste the Client ID and Client Secret
- In the ShipPress sidebar, click Hosting.
- Find the Pressable row and click Connect. You can also click Make an API key on Pressable ↗ to open the API Applications page in your browser.
- The dialog displays two fields: Client ID and Client Secret. The second field shows the placeholder Paste the Client Secret from MyPressable → User Settings → API Applications.
The Connect button stays off until both fields are filled, showing Enter the Client ID first. ShipPress shows this hint: As the account owner, make an API Application in MyPressable and paste its Client ID and Client Secret. Downloads and deploys go over SSH: the first time a site is used, ShipPress resets that site's SFTP user's password and keeps the new one itself, so a tool like FileZilla needs the new password.
When ready, click Connect. Your credentials are stored only in your system keychain, never in files or logs, and the AI never sees them.
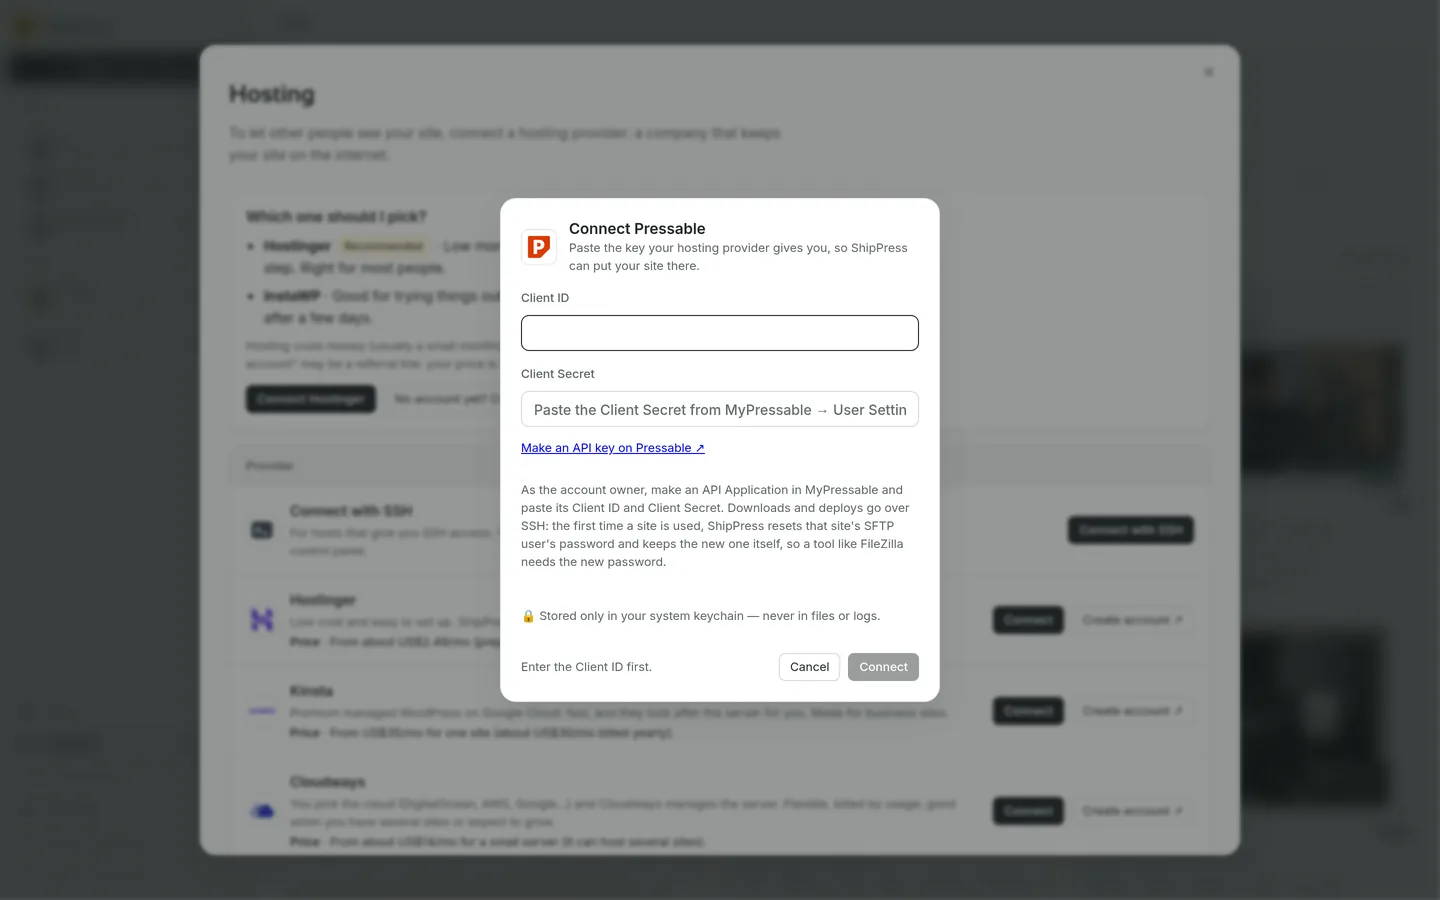
Pressable needs both the Client ID and the Client Secret. -
Create a site and go live
When you are ready to publish your website:
- Open your site in ShipPress and click Go live.
- Select the WordPress host tab and click Pressable.
- If you do not have a site yet, click New website on Pressable. Enter a Site name using only letters and numbers, such as
mysite, and click Create website. Setup takes a few minutes. - Select the site under Which web address.
- Click Replace and go live.
Keep ShipPress open while the process runs. Once finished, your site is live.
-
The SFTP password, and disconnecting
The first time ShipPress uses a site, it resets that site’s SFTP user password and keeps the new password in your system keychain. The old SFTP password stops working, so an SFTP tool like FileZilla will need the new password.
To bring changes back from Pressable to your computer, use Download to this computer (read our guide on how to download a site from your host).
If you want to disconnect, click Disconnect on the Pressable row in Hosting. ShipPress forgets the Client ID, Client Secret, and site connections on this computer. Your live websites keep running. You can manage or delete the API application in MyPressable.
-
Next in the series
- Next: WordPress.com over SSH
- Previous: Connect xCloud to ShipPress
- Overview: Get a web host and connect it to ShipPress
- Going live: Go live
- Downloading: Download a site from your host