
WordPress.com: sign up and connect it to ShipPress with SSH
This is part 8 and the final guide in our hosting series. WordPress.com hosts your website for you so you do not have to manage a server. Choose a plan that includes SSH, generate SFTP/SSH credentials in your dashboard, connect them in the ShipPress Mac, Windows & Linux app, and go live.
-
How WordPress.com connects
WordPress.com is the official WordPress service: your site lives with them and you manage no server. Its tagline in ShipPress reads “WordPress's own hosting · connects with SSH”. ShipPress needs the Business plan or higher, which is where SSH access comes in.
When you click Connect on the WordPress.com row, ShipPress opens the Connect with SSH dialog with the host details already filled in: Server address
ssh.wp.com, Port22, WordPress folder on the server/srv/htdocs, and Sign in with set to Password. The row explains: WordPress.com connects with SSH: once connected, your site shows up in the Connect with SSH card.Over SSH, ShipPress can put your site online (transferring Everything, Files only, or Database only), download the live site back to your computer, and run WP-CLI commands directly on the live server. Note that ShipPress cannot create a new site on WordPress.com; you create your site on WordPress.com first.
-
Sign up and pick a plan with SSH
To get started, use the signup button below to create your account. You can compare all available plans on the WordPress.com pricing page.
ShipPress requires a plan that includes SSH access, such as the Business or Commerce plan. Check WordPress.com's SSH guide to verify which plans currently provide SSH access before you purchase, and activate the plan on your site.
Sign up at WordPress.com ↗The signup button above is an affiliate link: if you sign up through it, ShipPress may earn a commission, at no extra cost to you (details).
-
Create SFTP/SSH credentials and turn on SSH
Follow the steps from WordPress.com's SSH guide to generate your login credentials:
- Open your Hosting Dashboard on WordPress.com.
- Click your site's title, then select Settings in the left sidebar.
- Scroll down to the SFTP/SSH section and click Create credentials. This generates a unique username and password for SFTP and SSH. Copy and save your password in a secure place, as clicking Reset password will create a new one.
- Turn on Enable SSH access to this site.
ShipPress provides this reminder right in the app: Needs the Business or Commerce plan. In the WordPress.com Hosting dashboard open your site → Settings → SFTP/SSH, click Create credentials, then turn on Enable SSH access; that page shows the username and password.
-
Connect WordPress.com in ShipPress
In the ShipPress sidebar, click Hosting. Find the WordPress.com row and click Connect.
The Connect with SSH dialog opens. ShipPress displays this guidance: The host is ssh.wp.com, port 22, with the password. The WordPress folder is usually /srv/htdocs; if the test fails after connecting, check it against the connection command on that page.
- Keep Server address set to
ssh.wp.com, Port set to22, and Sign in with set to Password. - Enter the Username and SSH password from your WordPress.com SFTP/SSH settings page.
- Keep WordPress folder on the server set to
/srv/htdocs. - Click Test connection. The button shows Testing… while ShipPress verifies four checkpoints: Reached the server, Confirm the server's identity, Logged in, and WordPress found in the folder.
- When asked Is this the server you expect?, compare the fingerprint with your host. If it matches, click Yes, it's my server (otherwise click Not sure, cancel).
Once all checks pass, ShipPress says it is connected to your site's address and that you can now go live, download the site and run WP-CLI over SSH. Click Done.
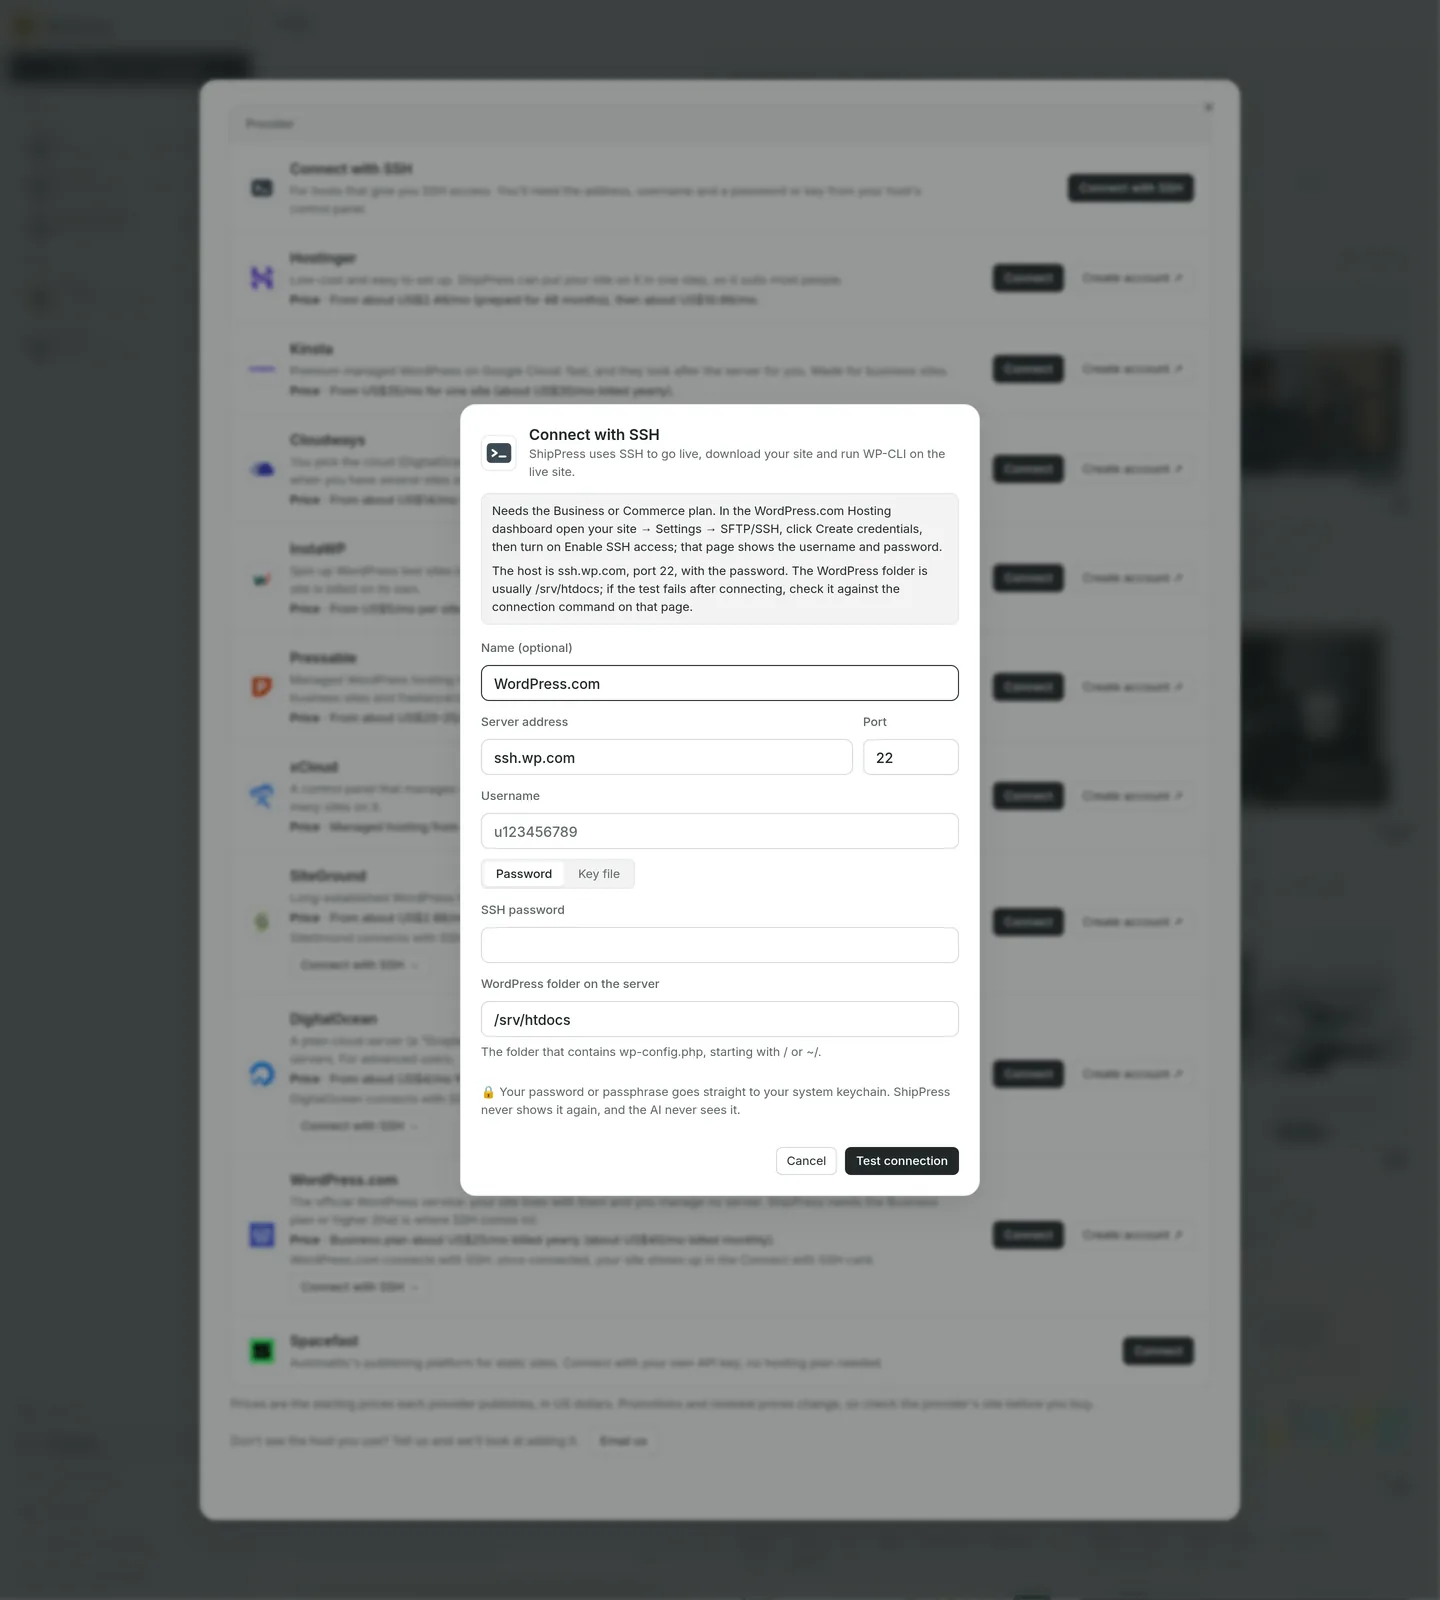
WordPress.com connects with SFTP/SSH. The host is ssh.wp.com, port 22. - Keep Server address set to
-
Go live
To publish your local site to WordPress.com, open your site in ShipPress and click Go live.
- Select the WordPress host tab, then click the SSH host button.
- Under Which web address (showing Choose a web address…), select your WordPress.com site address.
- ShipPress displays the warning: This overwrites everything on example.com and can't be undone.
- Under More options, you can choose to deploy Everything, Files only, or Database only. Choosing Everything replaces the live site's posts, pages, and settings (learn more in our sync guide).
- Click Replace and go live. Before overwriting the live site, ShipPress automatically saves a backup copy of the live database on your computer.
The button changes to Going live… while files transfer; keep ShipPress open until the process finishes. When completed, click Done or Open example.com ↗ to view your published site.
-
Passwords and disconnecting
If you click Reset password on WordPress.com, the SSH password stored in your system keychain will no longer work. In ShipPress, go to the Connect with SSH card, find the connection row, and click Disconnect.
ShipPress confirms: ShipPress forgets the SSH login saved on this computer. Your live website keeps running; you can connect again any time. After disconnecting, click Connect again and enter your new password.
Each saved connection row in the Connect with SSH card provides three actions:
- WP-CLI: run WP-CLI commands directly on your live site. Any command that makes changes asks for your explicit approval before running.
- Test again: check the server connection and credentials at any time.
- Disconnect: remove the stored connection from ShipPress.
If you ever want to copy your live site back to your local computer, open Sites → Online and click Download to this computer (see our download guide).
-
The whole series
This tutorial is the final part of our hosting series. Here are the other guides in the series and related resources:
- Web hosting series overview: compare all supported hosts and connection methods.
- Part 7: Pressable: the previous tutorial in this series.
- Part 1: Hostinger: start from the beginning of the series.
- Go live: learn how publishing and deployment work in ShipPress.
- Download a site from your host: how to bring changes from your live site back to your computer.